Azure IoT Hub Integration
Azure IoT Hub Integration connects ThingsBoard to Azure IoT Hub over MQTT as one registered device. It receives the cloud-to-device messages addressed to that device, and an uplink data converter transforms each message into device or asset data, including telemetry and attributes. ThingsBoard can also publish downlink messages to the hub as that device.
Use Azure IoT Hub Integration when:
- A backend application sends data to ThingsBoard as cloud-to-device messages through Azure IoT Hub.
- Messages for several ThingsBoard devices arrive through one device identity: the converter sets the target device for each message.
- An Azure-side consumer must receive ThingsBoard data from the hub’s built-in events endpoint.
Architecture
Section titled “Architecture”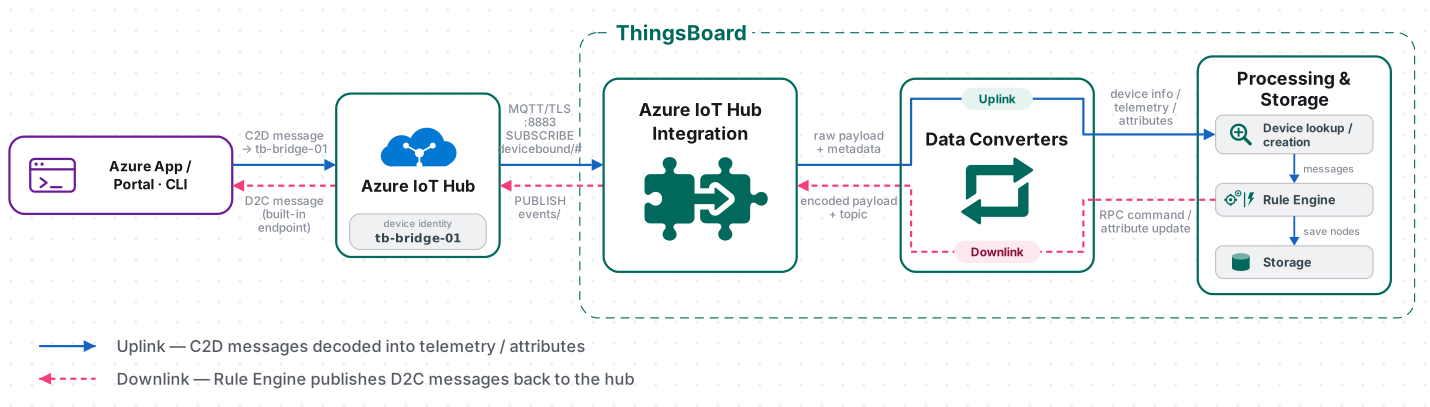
- Receive data. A backend application, the Azure portal, or the Azure CLI sends a cloud-to-device message to the integration’s device identity. The integration is subscribed to
devices/{deviceId}/messages/devicebound/#and receives it. - Decode the payload. The uplink converter identifies the target device or asset from the payload and extracts attributes and telemetry.
- Process the message. ThingsBoard processes the converted data through the Rule Engine. If Allow create devices or assets is enabled, ThingsBoard can create an entity that does not exist yet.
- Send downlink data (optional). The Rule Engine passes a message to the integration. The downlink converter encodes it, and the integration publishes it to
devices/{deviceId}/messages/events/as a device-to-cloud message.
Prerequisites
Section titled “Prerequisites”- Access to ThingsBoard Cloud with integrations enabled for your tenant.
- Permission to create integrations and data converters.
- An Azure account with an active subscription and permission to create an IoT hub and register devices.
- Outbound TCP port
8883open from the ThingsBoard server (or the remote integration host) to*.azure-devices.net.
Configure Azure IoT Hub
Section titled “Configure Azure IoT Hub”Create the hub and the device identity in the Azure portal.
Create an IoT Hub
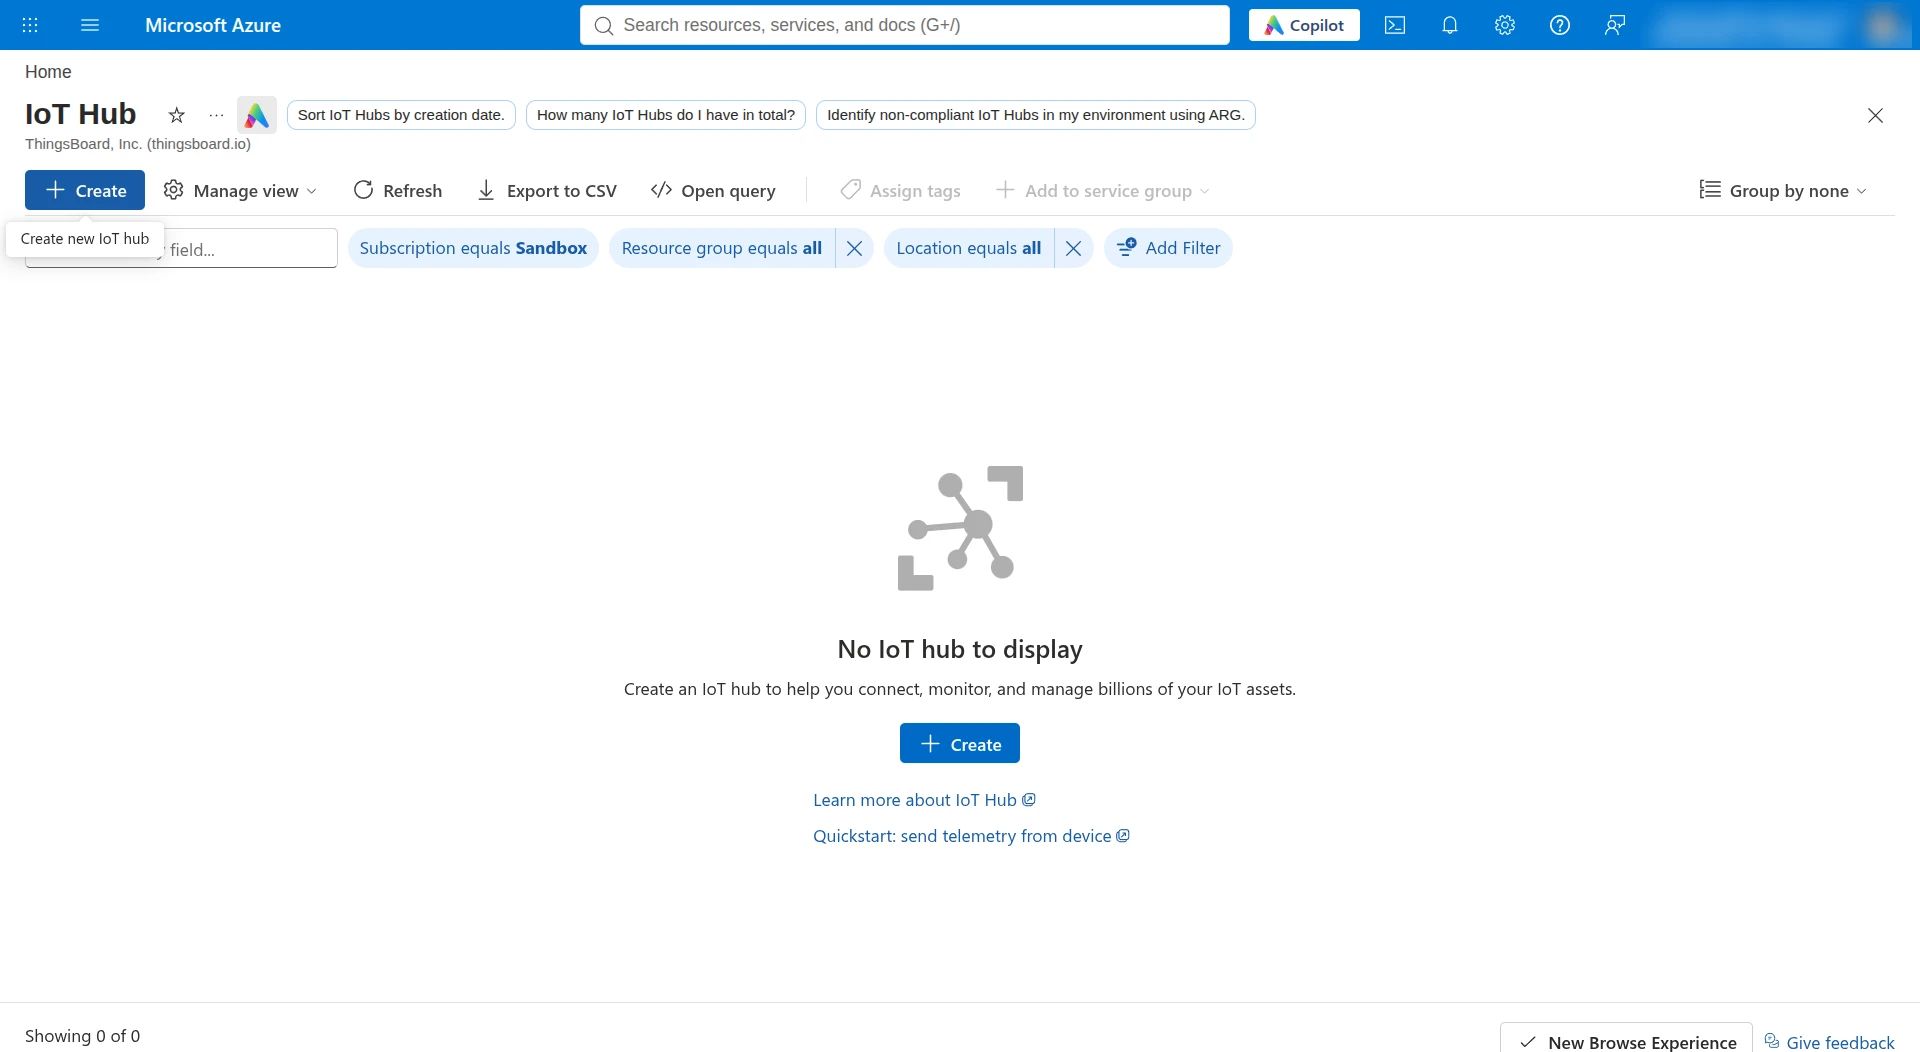
Section titled “Create an IoT Hub”- In the Azure portal, search for IoT Hub, open the IoT Hub service, and click + Create.
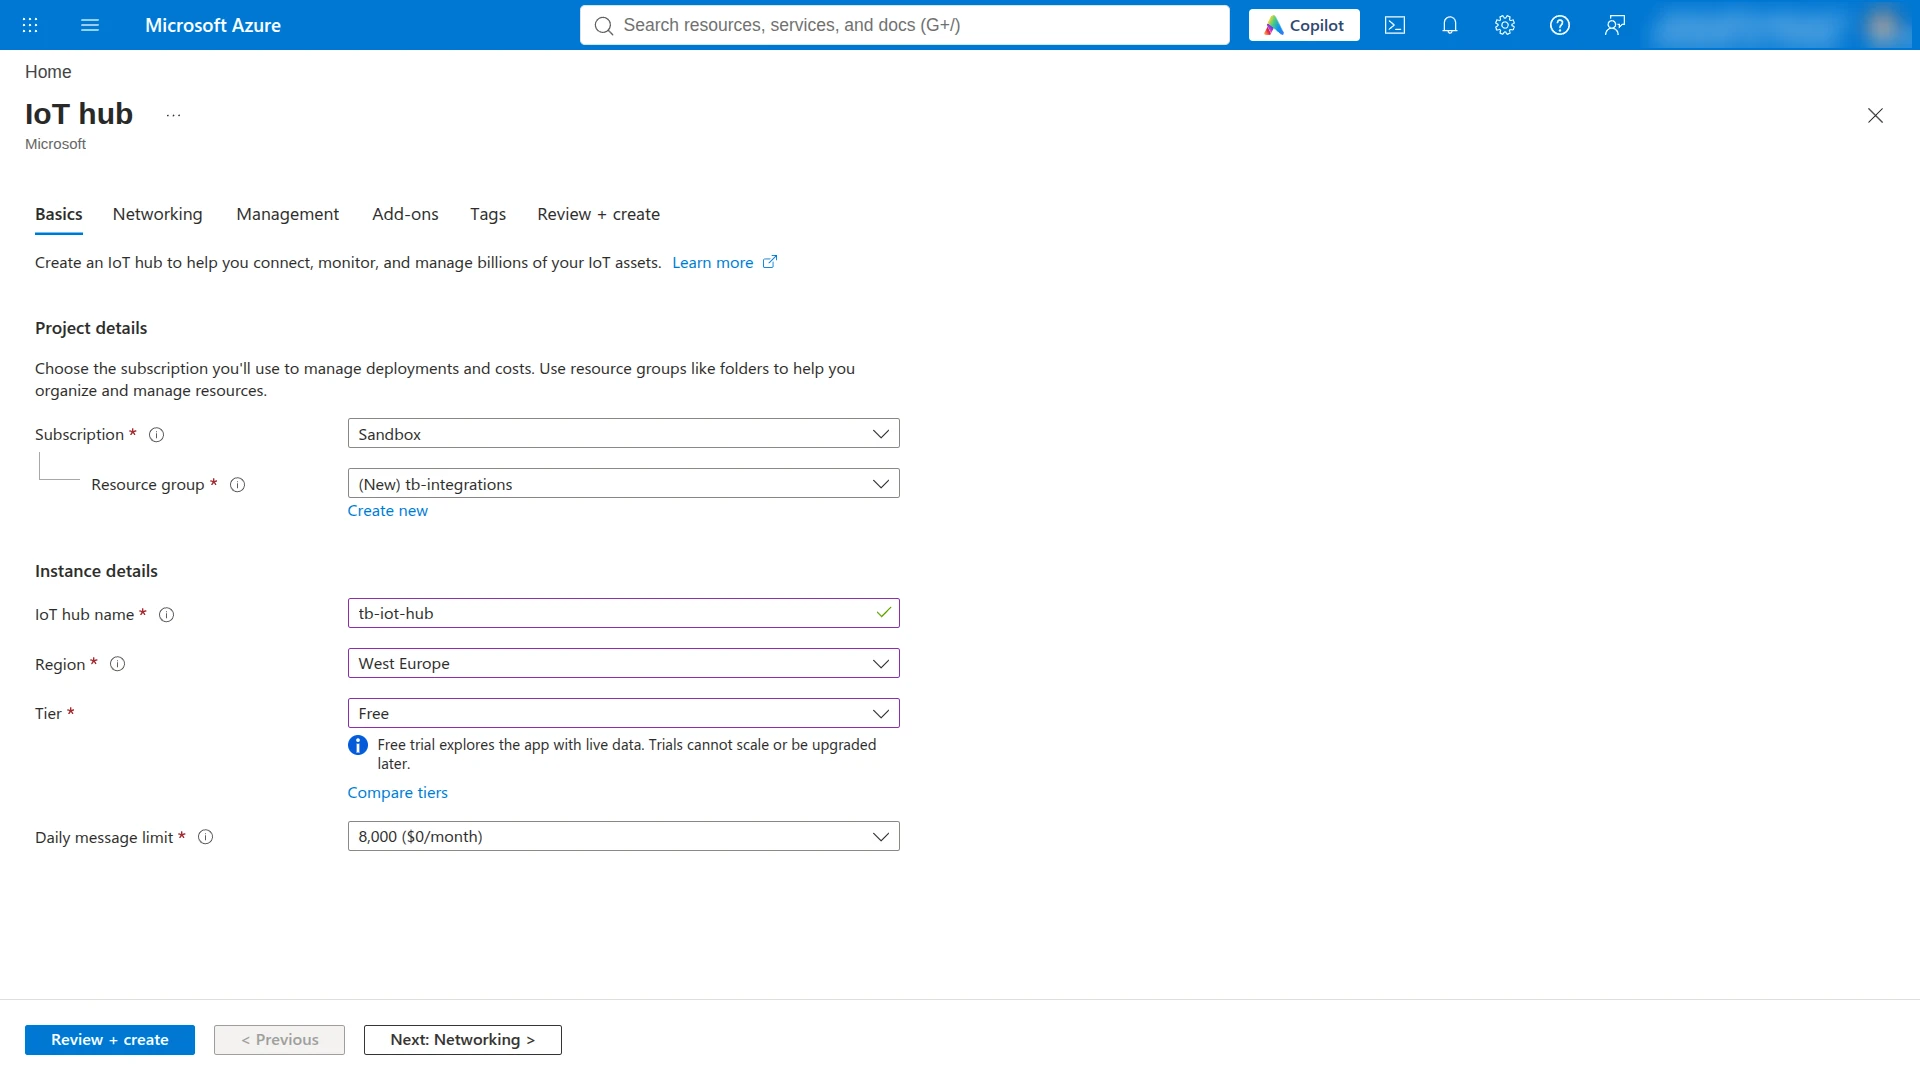
- On the Basics tab, select or create a Resource group, enter a globally unique IoT hub name (for example,
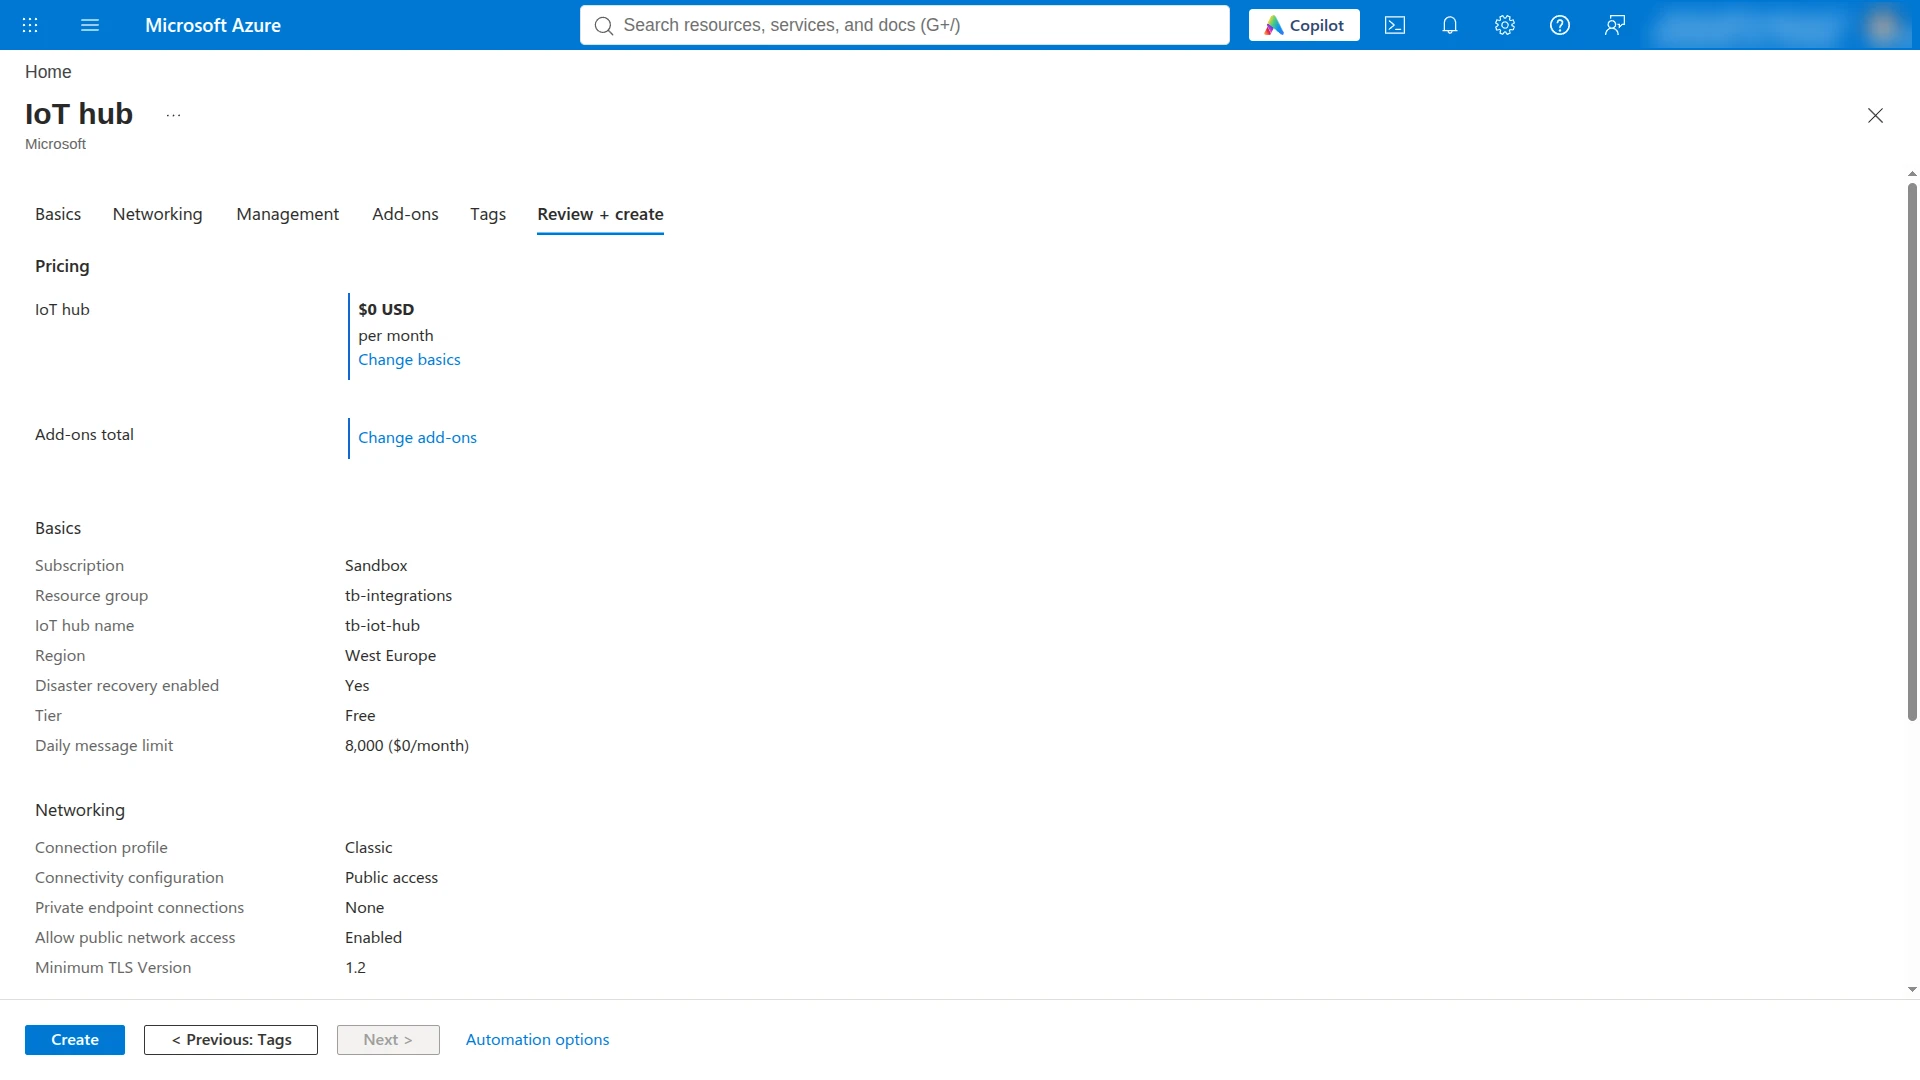
tb-iot-hub), choose a Region, and select a Tier. The Basic tier does not support cloud-to-device messages, so choose the Free or Standard tier. - Adjust the Networking and Management tabs if your environment requires it, then click Review + create and Create.
- When the deployment finishes, click Go to resource.
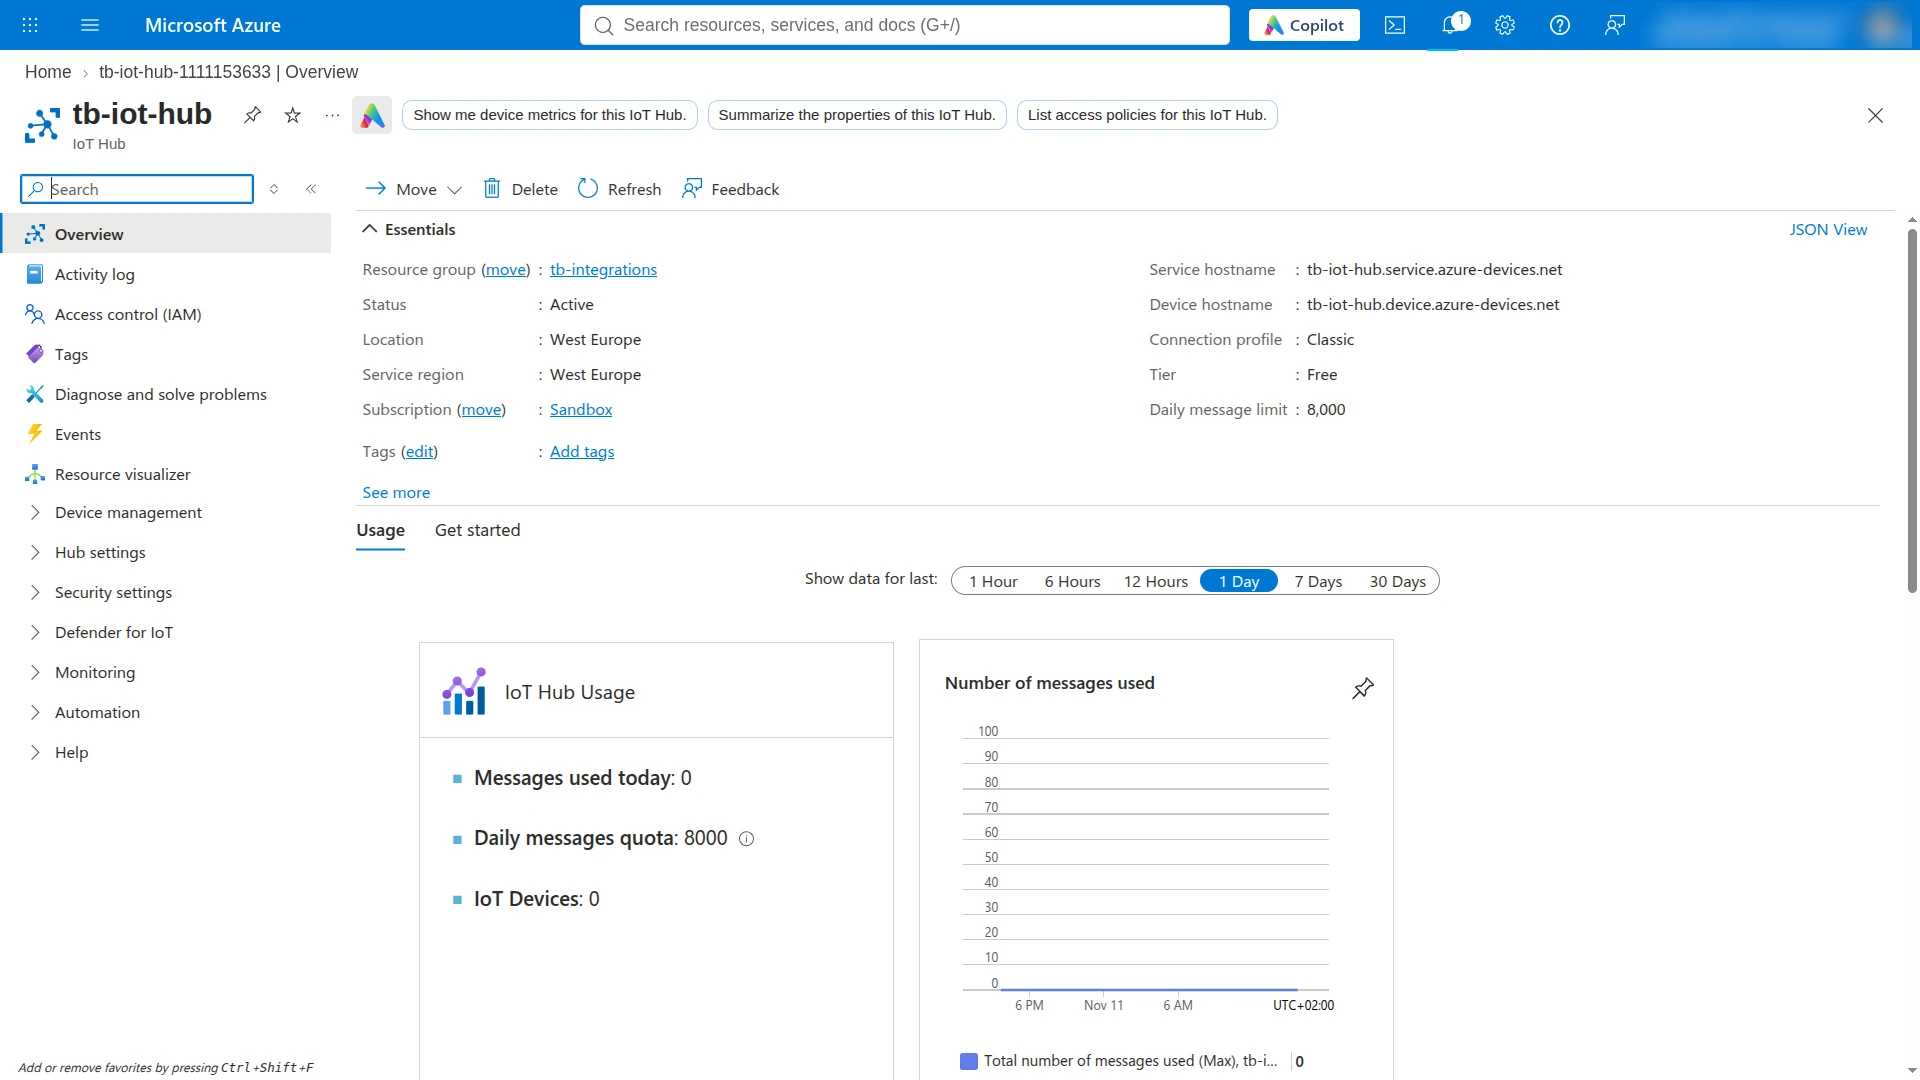
- Note the hub hostname
{hub-name}.azure-devices.net, for exampletb-iot-hub.azure-devices.net: the integration connects to it. The Overview page does not show it. It shows two other hostnames:- Service hostname
{hub-name}.service.azure-devices.net— for back-end services. The integration connects as a device, so do not use it. - Device hostname
{hub-name}.device.azure-devices.net— do not use it unless you upload DigiCert Global Root G3 (see Credentials): its server certificate does not chain to the root certificate that ThingsBoard uses by default, and the connection fails.
- Service hostname
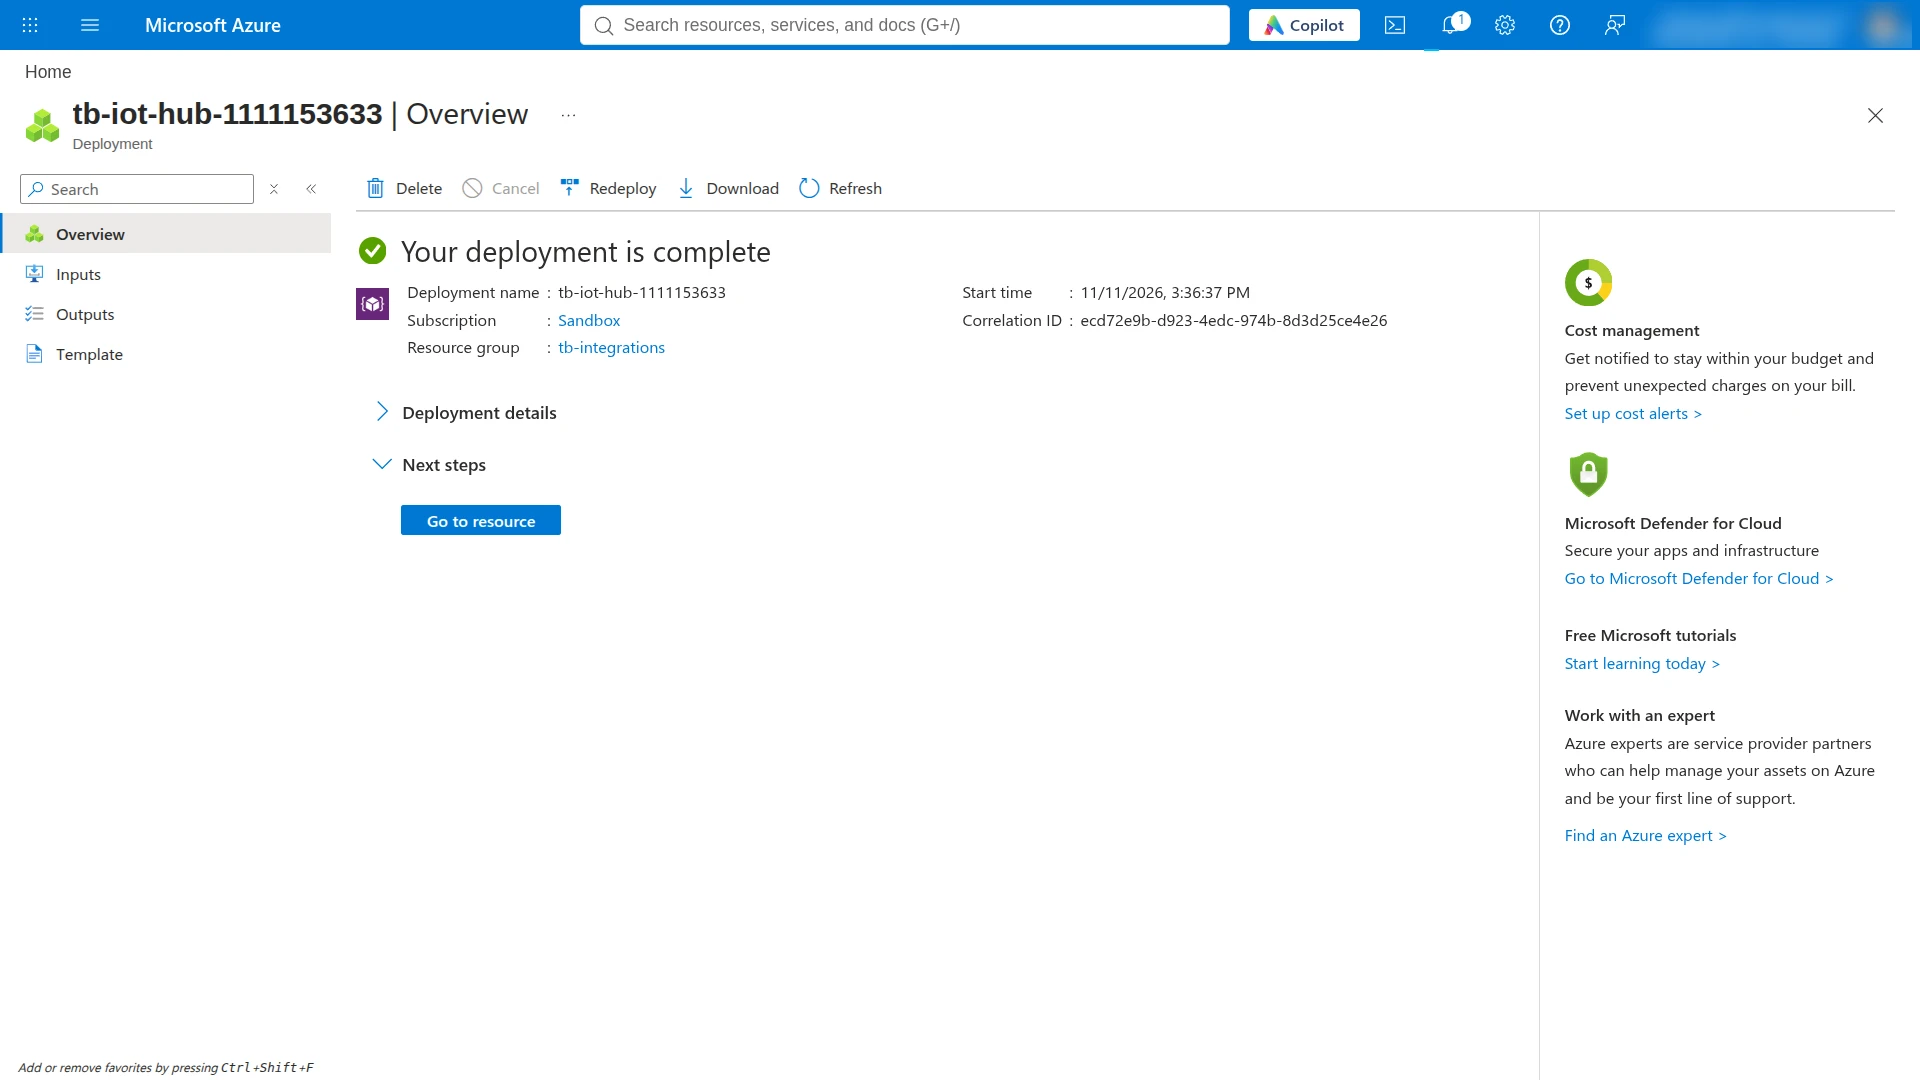
For tiers and limits, see Create an IoT hub.
Register a Device
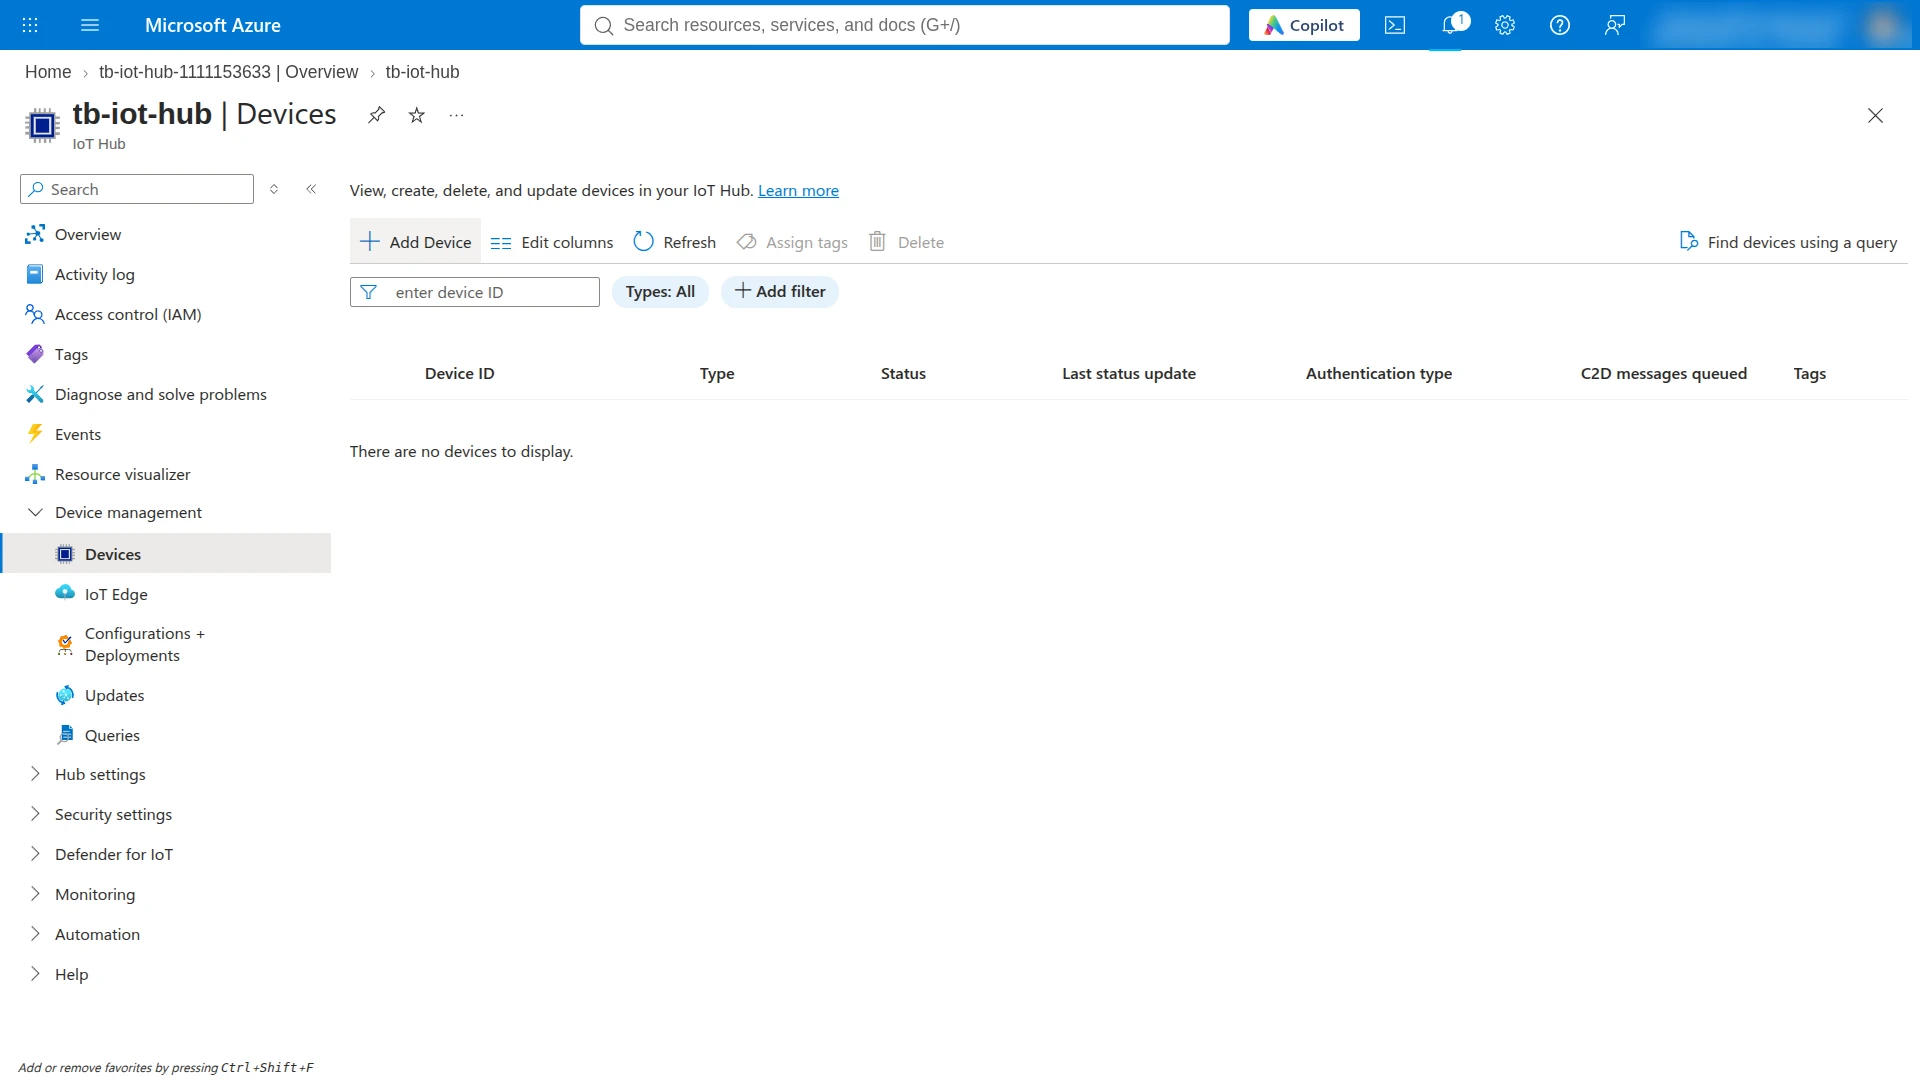
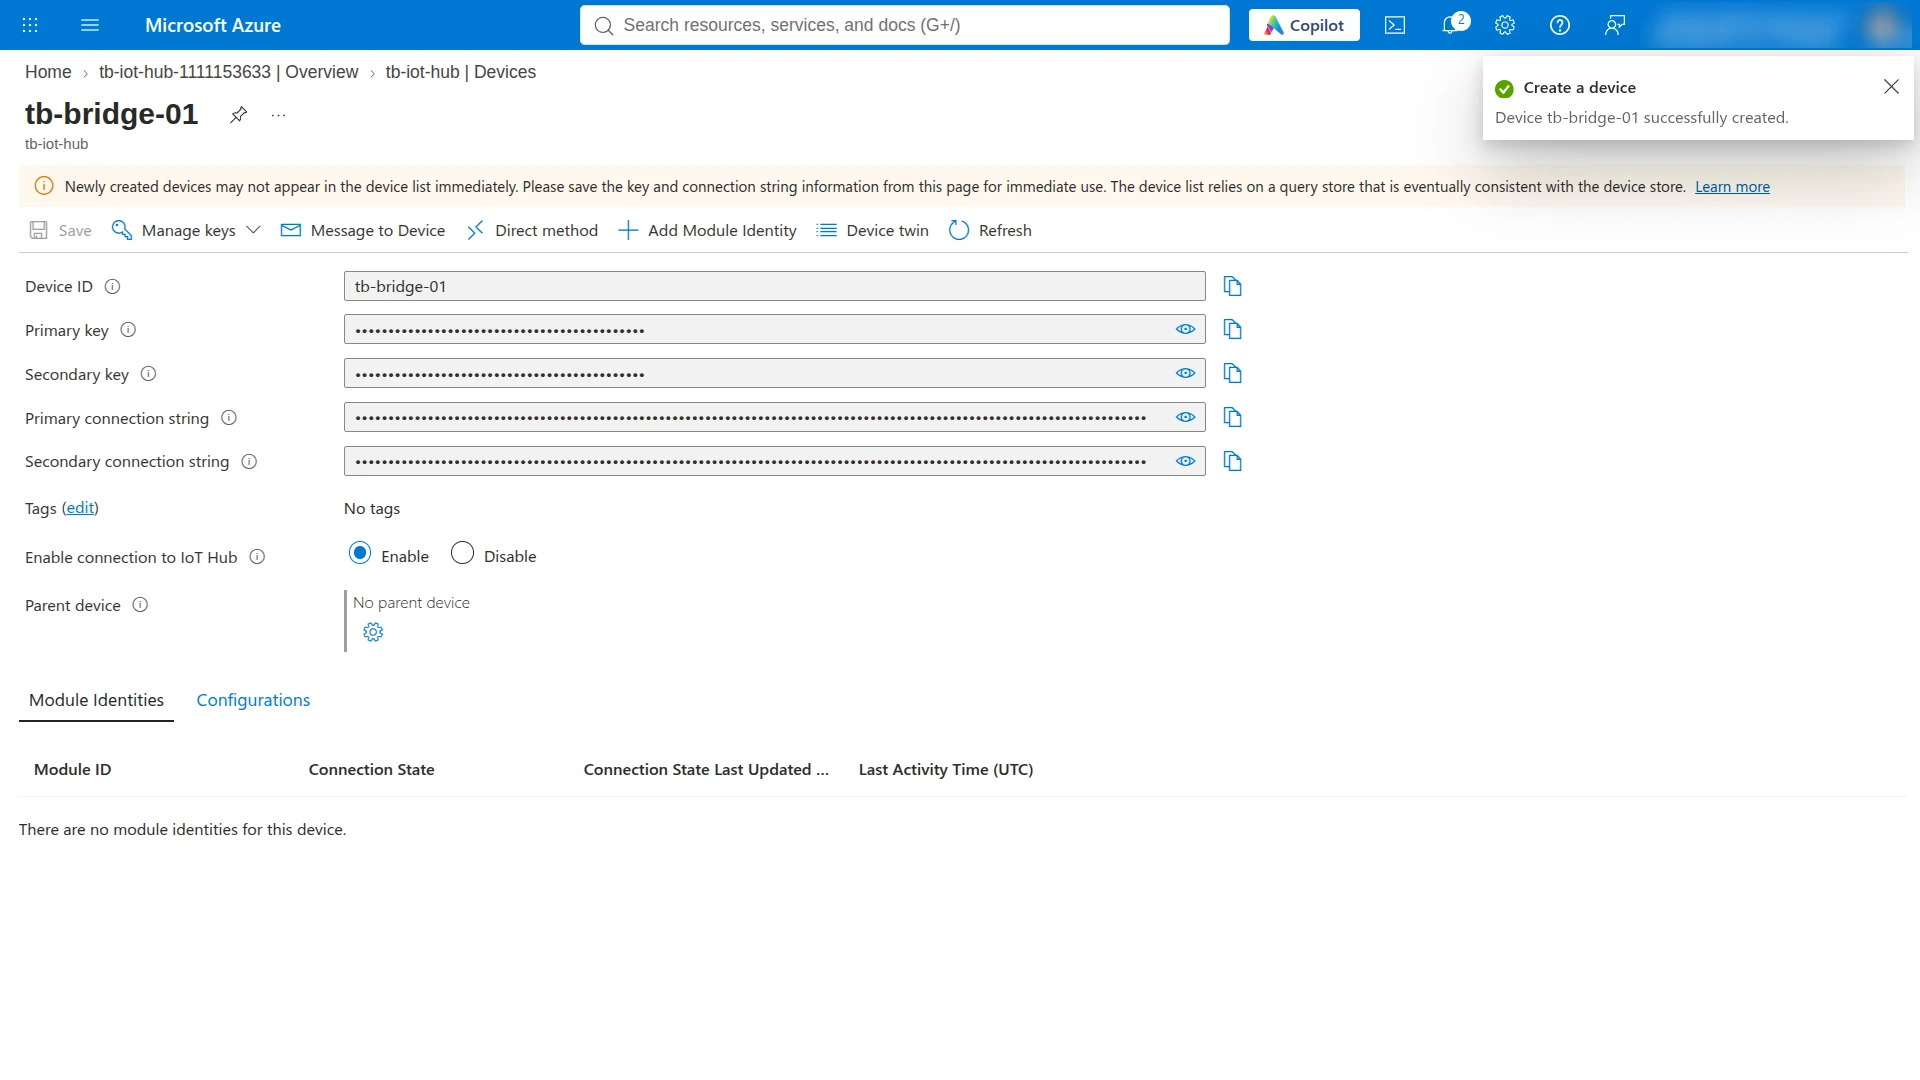
Section titled “Register a Device”- In the hub, go to Device management ⇾ Devices and click + Add Device.
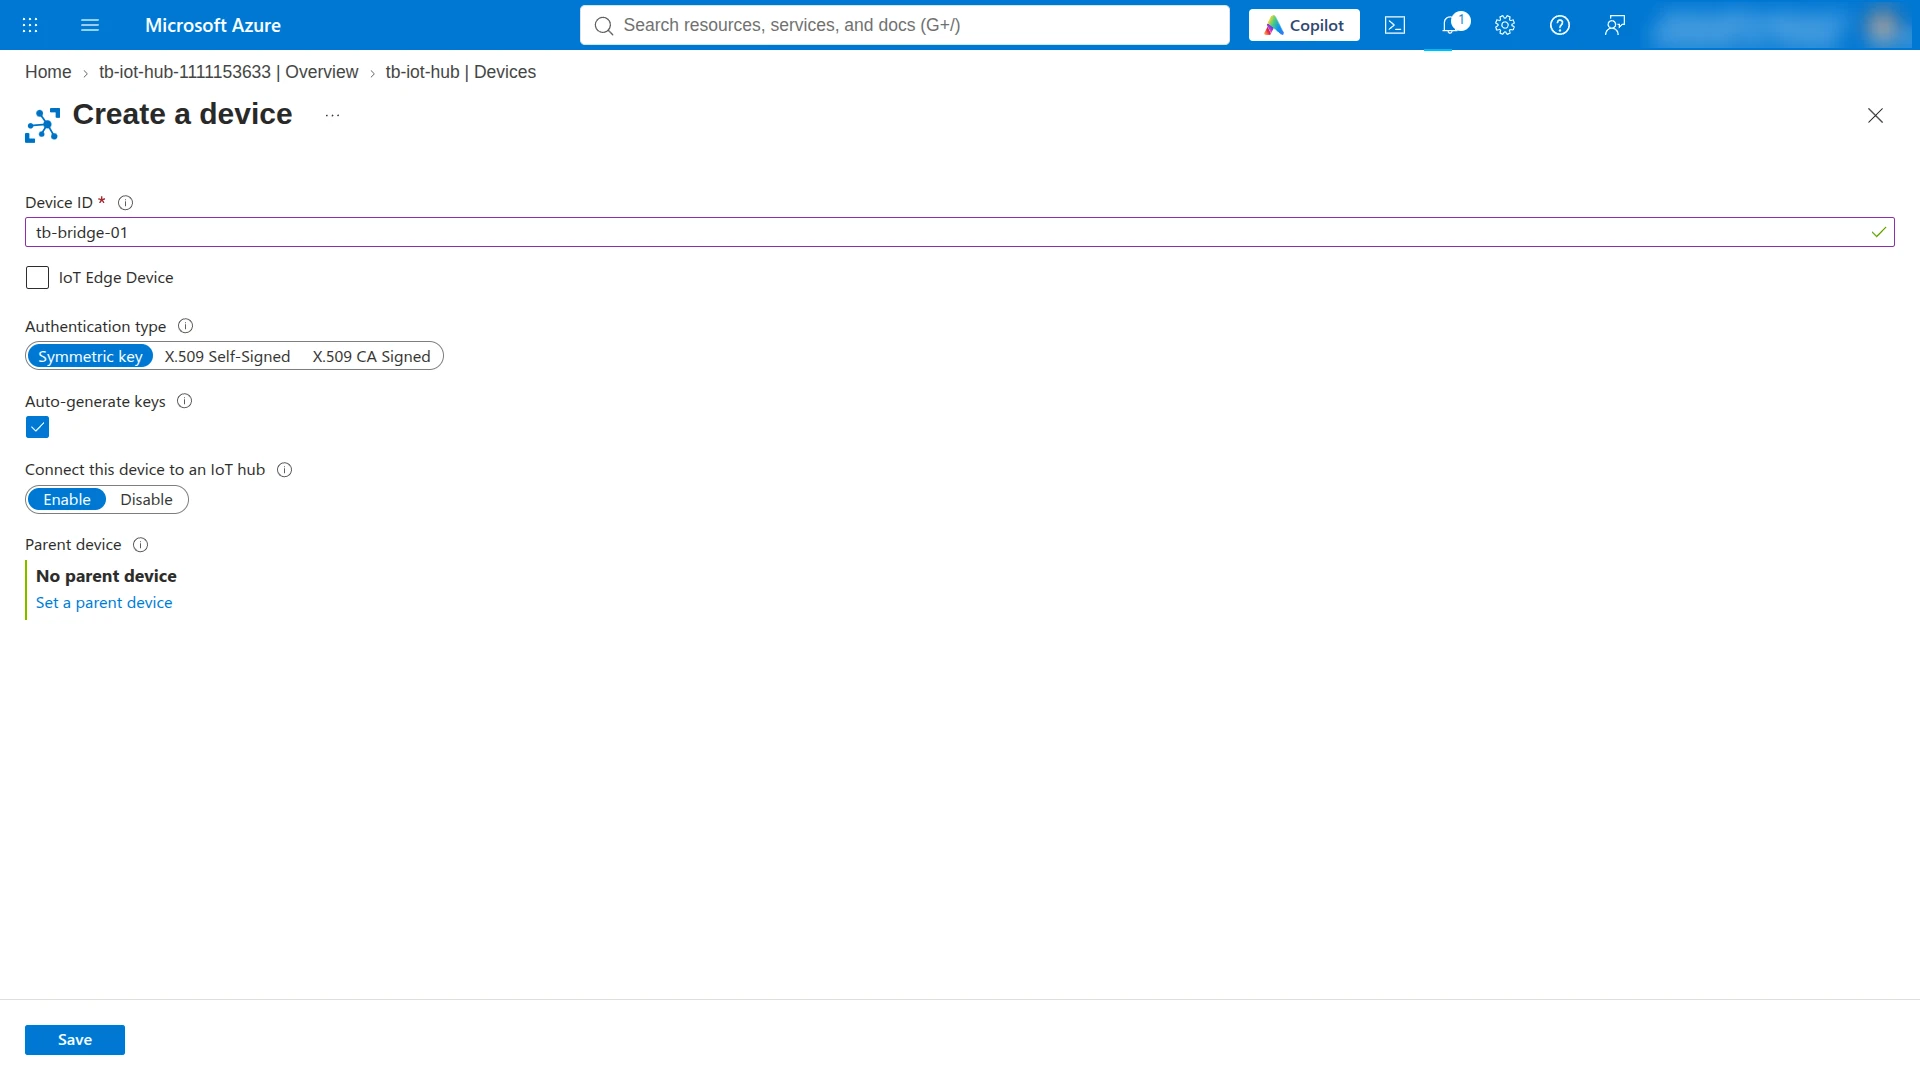
- Enter a Device ID, for example
tb-bridge-01. - Keep Authentication type set to Symmetric key and Auto-generate keys selected.
- Click Save. The device page opens.
- Copy the Primary key.
To authenticate with X.509 certificates instead, see Create and manage device identities and Credentials.
You now have the values for the integration:
| Value | Example | Source |
|---|---|---|
| Hostname | tb-iot-hub.azure-devices.net |
The hub name followed by .azure-devices.net |
| Device ID | tb-bridge-01 |
Device you registered |
| SAS Key | Primary key | Device page |
Set Up Azure IoT Hub Integration
Section titled “Set Up Azure IoT Hub Integration”Create the uplink converter, assign it to a new Azure IoT Hub integration, and send a test message.
Create the Uplink Data Converter
Section titled “Create the Uplink Data Converter”The uplink converter receives each message as a byte array plus its topic, resolves the target device, and returns its telemetry and attributes. Azure IoT Hub Integration uses the Generic converter: you write the decoder in TBEL or JavaScript. For converter types and the full decoder reference, see Uplink data converter.
This guide uses the sample payload that ThingsBoard provides for Azure IoT Hub converters, with a recent timestamp:
{ "deviceId": "8F4A2C6D", "deviceType": "Packing machine", "temperature": 25.5, "pressure": 1013.25, "vibration": { "x": 0.02, "y": 0.03, "z": 0.015 }, "location": { "latitude": 37.7749, "longitude": -122.4194, "altitude": 10 }, "timestamp": "2026-10-14T10:30:00Z", "status": "ALARM", "alarms": [ { "type": "temperature", "severity": "high", "message": "Temperature exceeds threshold." }, { "type": "vibration", "severity": "critical", "message": "Excessive vibration detected." } ], "metadata": { "version": 1, "batteryLevel": 100, "batteryStatus": "Charging", "manufacturer": "Example corporation" }}-
Go to Integrations ⇾ Data converters and click + Add data converter ⇾ Create new converter.
-
Converter type — keep Uplink.
-
Integration type — select Azure IoT Hub.
-
Name — enter a name, for example
Azure IoT Hub Uplink Converter. -
Main decoding configuration — the editor opens with the default Azure IoT Hub template. Replace it with the decoder below. The decoder takes the device name from
deviceIdand the device profile fromdeviceType, and rejects a message without them, so no device is created with a wrong name or profile. It maps measurements and state to telemetry and static device properties to attributes. It also readstimestamp,location, andvibrationwhen the payload carries them. The editor opens in TBEL. To use JavaScript, switch the TBEL / JS toggle: the editor then shows the generic JavaScript template, not an Azure IoT Hub one, so replace it with the JavaScript decoder below.var data = decodeToJson(payload);// The device name and type come from the payload. Reject the message if one is missing or empty.var deviceName = data.deviceId != null ? data.deviceId.toString().trim() : "";if (deviceName.isEmpty()) {raiseError("Payload has no deviceId");}var deviceType = data.deviceType != null ? data.deviceType.toString().trim() : "";if (deviceType.isEmpty()) {raiseError("Payload has no deviceType");}// ISO 8601 timestamp; fall back to server time.var ts = data.timestamp != null ? new Date(data.timestamp).getTime() : Date.now();// Static device properties become attributes.var attributes = {};if (data.location != null) {attributes.latitude = data.location.latitude;attributes.longitude = data.location.longitude;attributes.altitude = data.location.altitude;}if (data.metadata != null) {attributes.version = data.metadata.version;attributes.manufacturer = data.metadata.manufacturer;}// Measurements and state become telemetry.var telemetry = {temperature: data.temperature,pressure: data.pressure,status: data.status,receivedAlarms: data.alarms};if (data.vibration != null) {telemetry.vibrationX = data.vibration.x;telemetry.vibrationY = data.vibration.y;telemetry.vibrationZ = data.vibration.z;}if (data.metadata != null) {telemetry.batteryLevel = data.metadata.batteryLevel;telemetry.batteryStatus = data.metadata.batteryStatus;}return {deviceName: deviceName,deviceType: deviceType,attributes: attributes,telemetry: {ts: ts,values: telemetry}};var data = decodeToJson(payload);// The device name and type come from the payload. Reject the message if one is missing or empty.var deviceName = data.deviceId != null ? String(data.deviceId).trim() : "";if (!deviceName) {throw new Error("Payload has no deviceId");}var deviceType = data.deviceType != null ? String(data.deviceType).trim() : "";if (!deviceType) {throw new Error("Payload has no deviceType");}// ISO 8601 timestamp; fall back to server time.var ts = data.timestamp != null ? new Date(data.timestamp).getTime() : Date.now();// Static device properties become attributes.var attributes = {};if (data.location != null) {attributes.latitude = data.location.latitude;attributes.longitude = data.location.longitude;attributes.altitude = data.location.altitude;}if (data.metadata != null) {attributes.version = data.metadata.version;attributes.manufacturer = data.metadata.manufacturer;}// Measurements and state become telemetry.var telemetry = {temperature: data.temperature,pressure: data.pressure,status: data.status,receivedAlarms: data.alarms};if (data.vibration != null) {telemetry.vibrationX = data.vibration.x;telemetry.vibrationY = data.vibration.y;telemetry.vibrationZ = data.vibration.z;}if (data.metadata != null) {telemetry.batteryLevel = data.metadata.batteryLevel;telemetry.batteryStatus = data.metadata.batteryStatus;}var result = {deviceName: deviceName,deviceType: deviceType,attributes: attributes,telemetry: {ts: ts,values: telemetry}};// Convert the byte array to a string.function decodeToString(payload) {return String.fromCharCode.apply(String, payload);}// Convert the byte array to a JSON object.function decodeToJson(payload) {return JSON.parse(decodeToString(payload));}return result;To adapt:
- Device name in another field — replace
data.deviceId, for example withdata.serialNumber. - Optional fields — remove the
location,vibration,status, oralarmsmappings your devices never send. - Other telemetry — add keys to
telemetry, for examplehumidity: data.humidity. - Other device properties — add them to
attributes, for examplemodel: data.model. - Update-only keys — for Azure IoT Hub, ThingsBoard pre-fills the Update only keys list in Advanced decoding parameters with
manufacturer,receivedAlarms,status,batteryLevel,batteryStatus, andversion. These keys are stored only when their value changes. Edit the list to match your keys.
- Device name in another field — replace
-
Click Test decoder function and check the result (see Test the Decoder).
-
Click Add.
Decoder Inputs
The decoder signature is function decoder(payload, metadata): object | object[].
| Variable | Type | Content |
|---|---|---|
payload |
byte array | The message body. |
metadata |
{[key: string]: string} |
topic — the topic the message arrived on: devices/{deviceId}/messages/devicebound/ followed by the message’s property bag. Also integrationName and the key–value pairs from the integration’s Metadata field. |
For example, a message sent with the Azure CLI command from Send a Test Uplink arrives with this topic:
devices/tb-bridge-01/messages/devicebound/%24.mid=7c1b13d0-7baa-4cfb-a3c4-1bba7bcbc0b7&%24.to=%2Fdevices%2Ftb-bridge-01%2Fmessages%2Fdevicebound&%24.ce=utf-8&iothub-ack=noneThe part after devicebound/ is the URL-encoded property bag: $.mid is the message ID, $.to the destination, $.ce the content encoding.
Built-in helpers:
| Function | Result |
|---|---|
decodeToJson(payload) |
Parses the bytes as JSON and returns an object. |
decodeToString(payload) |
Converts the bytes to a UTF-8 string. |
toFlatMap(obj, excludeKeys, flatNested) |
TBEL only. Returns a flat key–value map of obj, skipping excludeKeys. With flatNested set to true, nested objects become dot-separated keys. |
For field renaming, nested values, and non-JSON payloads, see Common scripting patterns.
Test the Decoder
Click Test decoder function below the editor. Replace the content of Payload with the sample payload. Click Test. The Output panel shows:
{ "deviceName": "8F4A2C6D", "deviceType": "Packing machine", "attributes": { "latitude": 37.7749, "longitude": -122.4194, "altitude": 10, "version": 1, "manufacturer": "Example corporation" }, "telemetry": { "ts": 1791973800000, "values": { "temperature": 25.5, "pressure": 1013.25, "status": "ALARM", "receivedAlarms": [ { "type": "temperature", "severity": "high", "message": "Temperature exceeds threshold." }, { "type": "vibration", "severity": "critical", "message": "Excessive vibration detected." } ], "vibrationX": 0.02, "vibrationY": 0.03, "vibrationZ": 0.015, "batteryLevel": 100, "batteryStatus": "Charging" } }}ts is the payload’s timestamp, 2026-10-14T10:30:00Z, in milliseconds.
Check that deviceName is set and telemetry holds the expected keys. If the output is empty or shows an error, fix the decoder and test again.
Create the Integration
Section titled “Create the Integration”- Go to Integrations ⇾ Integrations and click + Add integration.
- Basic settings:
- Integration type — select Azure IoT Hub.
- Name — keep the default or enter your own.
- Enable integration and Allow create devices or assets — keep both on, so the device is created on its first uplink.
- Click Next.
- Uplink data converter:
- Click Select existing and choose
Azure IoT Hub Uplink Converter. - Alternatively, click Create new to write a decoder here.
- Click Next.
- Click Select existing and choose
- Downlink data converter:
- Click Skip. Add a downlink converter later if you need to send data to the hub.
- Connection:
- Hostname — enter the hub hostname, for example
tb-iot-hub.azure-devices.net. - Device ID — enter
tb-bridge-01. - Credentials — keep Shared Access Signature and paste the device’s primary key into SAS Key.
- Topic filters — replace the default
#withdevices/tb-bridge-01/messages/devicebound/#and set QoS to 1 - At least once. - Advanced settings — set Max bytes in message to
131072. IoT Hub sends cloud-to-device messages up to 64 KB, and with the default32368a larger message (the limit includes the topic) is lost without an event. - Leave the other parameters at their defaults. See Connection Settings for details.
- Hostname — enter the hub hostname, for example
- Click Add.
Connection Settings
Section titled “Connection Settings”| Parameter | Description |
|---|---|
| Hostname | Hub hostname, {hub-name}.azure-devices.net. Do not use the hostnames from the hub’s Overview page: the Service hostname {hub-name}.service.azure-devices.net is for back-end services, and the Device hostname {hub-name}.device.azure-devices.net works only if you upload DigiCert Global Root G3; see Credentials. |
| Device ID | The device identity the integration connects as. It is also the MQTT client ID. |
| Credentials | Shared Access Signature (default) or PEM. See Credentials. |
| Topic filters | Subscriptions, each with a Topic and QoS (0 or 1; IoT Hub does not support QoS 2). Default: # with QoS 0. Use devices/{deviceId}/messages/devicebound/# — IoT Hub delivers cloud-to-device messages only on this topic. The # is required because the hub appends a property bag to the topic. Use QoS 1: IoT Hub then waits for the integration to acknowledge each message, and reports a message that ThingsBoard did not receive (for example, because ThingsBoard stopped) as not delivered (Purged) instead of delivered. With QoS 0, IoT Hub reports each message as delivered as soon as it sends it. |
| Execute remotely | Runs the integration as a separate process outside the ThingsBoard cluster, for example in a network with access to Azure. ThingsBoard generates an Integration key and Integration secret for it. See Remote Integration. |
Advanced settings
| Parameter | Default | Description |
|---|---|---|
| Protocol version | MQTT 3.1.1 | The only version available. |
| Max bytes in message | 32368 |
Maximum size of an incoming message, in bytes (1–256,000,000), including the topic. Set 131072: IoT Hub sends cloud-to-device messages up to 64 KB, and a message over this limit is lost without an event. |
| Description | — | Free-text description. |
| Metadata | — | Key–value pairs added to the metadata of every message from this integration and to the encoder’s integrationMetadata. The encoder in this guide reads deviceId from it; see Create and Assign the Downlink Converter. |
The integration always connects over TLS on port 8883 with a clean session. IoT Hub delivers only the messages sent after the integration connects: messages sent while it is disabled, restarting, or offline are not delivered. The integration does not offer Check connection: check its status after you add it.
Credentials
Section titled “Credentials”| Type | Fields |
|---|---|
| Shared Access Signature | SAS Key — the device’s primary or secondary key. ThingsBoard builds a SAS token from it when the integration starts or its settings are saved. The token is valid for one year, so save the integration again before it expires. CA certificate file — optional; see below. |
| PEM | X.509 authentication. Certificate file — the device certificate registered in the hub. Private key file — the key for that certificate. Private key password — only for an encrypted key. CA certificate file — optional; see below. |
Without a CA certificate file, the integration verifies the hub with the DigiCert Global Root G2 certificate, which {hub-name}.azure-devices.net uses. A CA certificate file replaces it. With Shared Access Signature, the integration reads only the first certificate in the file, so upload a single root certificate: for example, DigiCert Global Root G3 to connect to the Device hostname {hub-name}.device.azure-devices.net. For X.509 device registration, see Authenticate identities with X.509 certificates.
Test Uplink
Section titled “Test Uplink”Send a cloud-to-device message to the integration’s device identity, then confirm that ThingsBoard decoded it and created the device.
Send a Test Uplink
Section titled “Send a Test Uplink”Send the sample payload without timestamp. The decoder then uses the current server time; with a fixed timestamp, the data would fall outside the recent time windows of your dashboards as time passes.
-
In the hub, go to Device management ⇾ Devices and open
tb-bridge-01. -
Click Message to Device.
-
Paste the payload into Message Body:
{"deviceId": "8F4A2C6D","deviceType": "Packing machine","temperature": 25.5,"pressure": 1013.25,"vibration": {"x": 0.02,"y": 0.03,"z": 0.015},"location": {"latitude": 37.7749,"longitude": -122.4194,"altitude": 10},"status": "ALARM","alarms": [{"type": "temperature","severity": "high","message": "Temperature exceeds threshold."},{"type": "vibration","severity": "critical","message": "Excessive vibration detected."}],"metadata": {"version": 1,"batteryLevel": 100,"batteryStatus": "Charging","manufacturer": "Example corporation"}} -
Click Send Message.
Install the azure-iot extension, then run:
az iot device c2d-message send \ --hub-name tb-iot-hub \ --device-id tb-bridge-01 \ --data '{"deviceId":"8F4A2C6D","deviceType":"Packing machine","temperature":25.5,"pressure":1013.25,"vibration":{"x":0.02,"y":0.03,"z":0.015},"location":{"latitude":37.7749,"longitude":-122.4194,"altitude":10},"status":"ALARM","alarms":[{"type":"temperature","severity":"high","message":"Temperature exceeds threshold."},{"type":"vibration","severity":"critical","message":"Excessive vibration detected."}],"metadata":{"version":1,"batteryLevel":100,"batteryStatus":"Charging","manufacturer":"Example corporation"}}'Verify the Result
Section titled “Verify the Result”- Integration events — go to Integrations ⇾ Integrations, open the integration, and click the Events tab. The uplink appears with status OK. Click
⋅⋅⋅in the Message column to see the payload. - Converter events — open
Azure IoT Hub Uplink Converterin Integrations ⇾ Data converters and click the Events tab. In shows the received payload, Out shows the decoded result, and Metadata shows the topic and integration name. - Device — go to Devices & assets ⇾ Devices. The integration has created 8F4A2C6D with the
Packing machineprofile. Open it and check the Latest telemetry tab fortemperature,pressure,status,receivedAlarms,vibrationX–vibrationZ,batteryLevel, andbatteryStatus, and the Attributes tab forlatitude,longitude,altitude,version, andmanufacturer.
Configure Downlink
Section titled “Configure Downlink”ThingsBoard publishes downlinks to the hub when the Rule Engine routes a message to the integration — for example, after a shared attribute update. Downlinks are published with QoS 1 as device-to-cloud messages from the integration’s Device ID. They reach the hub’s built-in events endpoint, where an Azure-side consumer reads them.
The topic comes from the topic value in the downlink converter’s output metadata. The integration has no fixed downlink topic, so the encoder must set topic to devices/{deviceId}/messages/events/, with the integration’s Device ID. IoT Hub closes the connection when a device publishes to any other topic. The encoder does not receive the Device ID field, so this guide adds the Device ID to the integration’s Metadata as deviceId, and the encoder builds the topic from it. To identify the ThingsBoard device, put its name in the payload.
The downlink converter turns a Rule Engine message into the published payload. For the full encoder reference, see Downlink data converter.
Create and Assign the Downlink Converter
Section titled “Create and Assign the Downlink Converter”The encoder returns:
contentType—JSON,TEXT, orBINARY.data— the payload to publish.metadata—topic, the topic to publish to.
The encoder reads:
msg,msgType,metadata— the Rule Engine message, its type, and its metadata. For RPC commands,msg.methodandmsg.paramsare available.integrationMetadata—integrationNameand the key–value pairs from the integration’s Metadata field. The encoder in this guide readsdeviceIdfrom it.
- Open the integration in Integrations ⇾ Integrations and click Toggle edit mode (pencil icon).
- In the Downlink data converter field, click Create new. The Downlink converter type and Azure IoT Hub integration type are preselected.
- Enter a name, for example
Azure IoT Hub Downlink Converter. - In Main encoding configuration, replace the default encoder with the one below. To use JavaScript, switch the TBEL / JS toggle and take the code from the JavaScript tab.
- To record downlink events, click the debug icon next to the name, select All messages, and click Apply.
- Click Add.
- In the integration, expand Advanced settings. In Metadata, click Add, enter
deviceIdas the key and the integration’s Device ID as the value, for exampletb-bridge-01. - Click Apply changes.
Encoder used in this guide:
/** Encoder **/
// The rule chain adds the ThingsBoard device name to the metadata.// Reject the message if it is missing or empty.var deviceName = metadata.deviceName != null ? metadata.deviceName.trim() : "";if (deviceName == "") {  raiseError("Message metadata has no deviceName");}
// The integration Metadata adds the Azure IoT Hub device ID.// Reject the message if it is missing or empty.var azureDeviceId = integrationMetadata.deviceId != null ? integrationMetadata.deviceId.trim() : "";if (azureDeviceId == "") {  raiseError("Integration metadata has no deviceId");}
// Prepare the downlink payload.var data = {  deviceName: deviceName,  ts: Date.now()};
// Map Rule Engine messages to commands.if (msgType == 'RPC_CALL_FROM_SERVER_TO_DEVICE') {  // RPC request.  data.method = msg.method;  data.params = msg.params;  data.requestId = metadata.requestId;} else if (msgType == 'ATTRIBUTES_UPDATED' || msgType == 'POST_ATTRIBUTES_REQUEST') {  // Shared attribute update.  data.method = 'setSharedAttributes';  data.params = msg;} else {  // Other message types.  data.method = 'data';  data.params = msg;}
// Return the encoded downlink payload.var result = {  // Payload content type: JSON, TEXT, or BINARY (Base64).  contentType: 'JSON',  data: JSON.stringify(data),  metadata: {    // Azure IoT Hub device-to-cloud MQTT topic for this device ID.    topic: 'devices/' + azureDeviceId + '/messages/events/'  }};
return result;/** Encoder **/
// The rule chain adds the ThingsBoard device name to the metadata.// Reject the message if it is missing or empty.var deviceName = typeof metadata.deviceName === "string" ? metadata.deviceName.trim() : "";if (!deviceName) { throw new Error("Message metadata has no deviceName");}
// The integration Metadata adds the Azure IoT Hub device ID.// Reject the message if it is missing or empty.var azureDeviceId = typeof integrationMetadata.deviceId === "string" ? integrationMetadata.deviceId.trim() : "";if (!azureDeviceId) { throw new Error("Integration metadata has no deviceId");}
// Prepare the downlink payload.var data = { deviceName: deviceName, ts: Date.now()};
// Map Rule Engine messages to commands.if (msgType == 'RPC_CALL_FROM_SERVER_TO_DEVICE') { // RPC request. data.method = msg.method; data.params = msg.params; data.requestId = metadata.requestId;} else if (msgType == 'ATTRIBUTES_UPDATED' || msgType == 'POST_ATTRIBUTES_REQUEST') { // Shared attribute update. data.method = 'setSharedAttributes'; data.params = msg;} else { // Other message types. data.method = 'data'; data.params = msg;}
// Return the encoded downlink payload.var result = { // Payload content type: JSON, TEXT, or BINARY (Base64). contentType: 'JSON', data: JSON.stringify(data), metadata: { // Azure IoT Hub device-to-cloud MQTT topic for this device ID. topic: 'devices/' + azureDeviceId + '/messages/events/' }};
return result;To check the encoder, click Test encoder function. Message type is already ATTRIBUTES_UPDATED. Set Message to {"temperatureUploadFrequency":60} and deviceName in Metadata to 8F4A2C6D, if they differ. Integration metadata has only integrationName until the converter records a downlink event, so click Add and enter deviceId with your Device ID, for example tb-bridge-01. Click Test. The Output shows:
{ "contentType": "JSON", "data": "{\"deviceName\":\"8F4A2C6D\",\"ts\":1794478688069,\"method\":\"setSharedAttributes\",\"params\":{\"temperatureUploadFrequency\":60}}", "metadata": { "topic": "devices/tb-bridge-01/messages/events/" }}To adapt:
- Another envelope — build
datain the structure your Azure-side consumer expects. - Payload as is — use
data: JSON.stringify(msg)and drop the branches. - Message properties — append a URL-encoded property bag to the topic, for example
'devices/' + azureDeviceId + '/messages/events/source=thingsboard'. IoT Hub routing queries can filter on these properties. - Other message types — add branches for other Rule Engine message types.
Configure the Root Rule Chain
Section titled “Configure the Root Rule Chain”The encoder puts deviceName in the payload, so the rule chain first adds the device name to the message metadata.
- Go to Data processing ⇾ Rule chains and open the Root Rule Chain.
- From the Enrichment section, drag an originator fields node onto the canvas.
- Enter a Name (for example,
Retrieve device name) and map the source fields:- Name ⇾ deviceName
- Add mapped originator fields to ⇾ Metadata
- Click Add.
- Connect the message type switch node to the originator fields node with the Attributes Updated relation.
- From the Action section, drag an integration downlink node onto the canvas.
- Enter a Name (for example,
Downlink to Azure IoT Hub), select your Azure IoT Hub integration, and click Add. - Connect the originator fields node to the integration downlink node with the Success relation.
- Click Apply changes.
Test Downlink
Section titled “Test Downlink”IoT Hub does not keep a viewable history of device-to-cloud messages, so start monitoring before you trigger the downlink.
-
Start the event monitor:
Terminal window az iot hub monitor-events --hub-name tb-iot-hub --device-id tb-bridge-01 -
Go to Devices & assets ⇾ Devices, select 8F4A2C6D, and open the Attributes tab.
-
Select Shared attributes and click +.
-
Set Key to
temperatureUploadFrequency, Type to Integer, Value to60, and click Add. ThingsBoard publishes the downlink.
Verify the Downlink
Section titled “Verify the Downlink”-
Monitor output — within a few seconds, the terminal prints the event:
{"event": {"origin": "tb-bridge-01","module": "","interface": "","component": "","payload": "{\"deviceName\":\"8F4A2C6D\",\"ts\":1794478688069,\"method\":\"setSharedAttributes\",\"params\":{\"temperatureUploadFrequency\":60}}"}} -
Converter events — open the downlink converter’s Events tab. In shows the Rule Engine message, Out shows the encoded payload and the topic, and Metadata shows the integration name and
deviceId.
Troubleshooting
Section titled “Troubleshooting”| Symptom | Cause | Fix |
|---|---|---|
Integration is not connected, error Failed to connect to MQTT broker at <hostname>:8883. |
Wrong Hostname, or the Service hostname or Device hostname from the hub’s Overview page is used. | Enter {hub-name}.azure-devices.net, or upload DigiCert Global Root G3 to use the Device hostname. See Create an IoT Hub and Credentials. |
Integration is not connected, error … Result code is: CONNECTION_REFUSED_NOT_AUTHORIZED |
Wrong Device ID or SAS Key. | Compare both with the device details in the Azure portal. Regenerate the key if unsure. |
Integration is not connected, error Failed to connect to MQTT broker at <hostname>:8883., from a private network |
Outbound port 8883 is blocked. |
Open TCP 8883 to *.azure-devices.net, or use a Remote Integration. |
| Some messages never arrive, no event or error | Another client connected with the same Device ID. IoT Hub closes the integration’s connection, and messages sent until it reconnects are lost. | Use a dedicated device identity for the integration. To confirm, check the device’s connection state in the hub, or look for error 400027 ConnectionForcefullyClosedOnNewConnection in the IoT Hub logs. |
| Downlink event is OK, but nothing reaches the hub | The encoder’s topic is not devices/{deviceId}/messages/events/ with the integration’s Device ID. With the encoder from this guide, deviceId in the integration’s Metadata differs from Device ID. IoT Hub drops the message and closes the connection; the integration reconnects within seconds and records no error. |
Set deviceId in Metadata to the integration’s Device ID. |
| No messages received | The topic filter does not match. | Use devices/{deviceId}/messages/devicebound/#, ending in #. |
| Messages sent while the integration was disabled or offline never arrive | When the integration reconnects with a clean session, IoT Hub discards the messages queued while it was disconnected. | Send the messages again after the integration is connected. |
| Device telemetry never arrives | Devices send device-to-cloud messages, which this integration does not receive. | Use the Azure Event Hub Integration. |
Device not created, the converter event has the error Payload has no deviceId or Payload has no deviceType |
The message has no deviceId or deviceType, or the value is empty. |
Add both fields to the message, or change the decoder to read them from other fields. |
| Device not created, no converter error | Allow create devices or assets is off. | Turn it on in the integration settings. |
| Large messages never arrive, no event | The message, with its topic, exceeds Max bytes in message. The integration closes the connection and reconnects, and IoT Hub drops the message (Purged in delivery feedback). |
Set Max bytes in message to 131072 in Advanced settings. |
| Downlink produces no event | The rule chain does not reach the integration downlink node. | Check the Root Rule Chain wiring and turn on debug mode for its nodes. |
Downlink not sent, the downlink converter event has the error Message metadata has no deviceName |
The rule chain does not add the device name to the message metadata. | Add the originator fields node with Name ⇾ deviceName before the integration downlink node. See Configure the Root Rule Chain. |
Downlink not sent, the downlink converter event has the error Integration metadata has no deviceId |
The integration’s Metadata has no deviceId. |
Add deviceId with the integration’s Device ID. See Create and Assign the Downlink Converter. |
| Downlink sent, nothing in the monitor | The monitor started after the downlink. | Start az iot hub monitor-events first, then trigger the downlink. |
To read debug events, open the integration or converter, click Events, and select an event: In is the received data, Out is the converter result, and Error holds the error text.
See Also
Section titled “See Also”- Integrations overview — how integrations, converters, uplinks, and downlinks fit together.
- Azure Event Hub Integration — read device-to-cloud telemetry from the hub’s built-in endpoint.
- Uplink data converter — decoder inputs, output format, and scripting patterns.
- Downlink data converter — encoder reference.
- Remote Integration — run the integration outside the ThingsBoard cluster.
- TBEL — built-in functions and syntax for converter scripts.
- Rule Engine — how messages are processed after decoding.
Was this helpful?