
ThingPark Enterprise Integration
The Actility ThingPark Enterprise integration connects ThingsBoard to a private, on-premise ThingPark Enterprise LoRaWAN network server. Use it to bring telemetry from LoRaWAN devices already registered in ThingPark Enterprise into ThingsBoard for monitoring and rule-based automation — including sending commands back to those devices.
Architecture
Section titled “Architecture”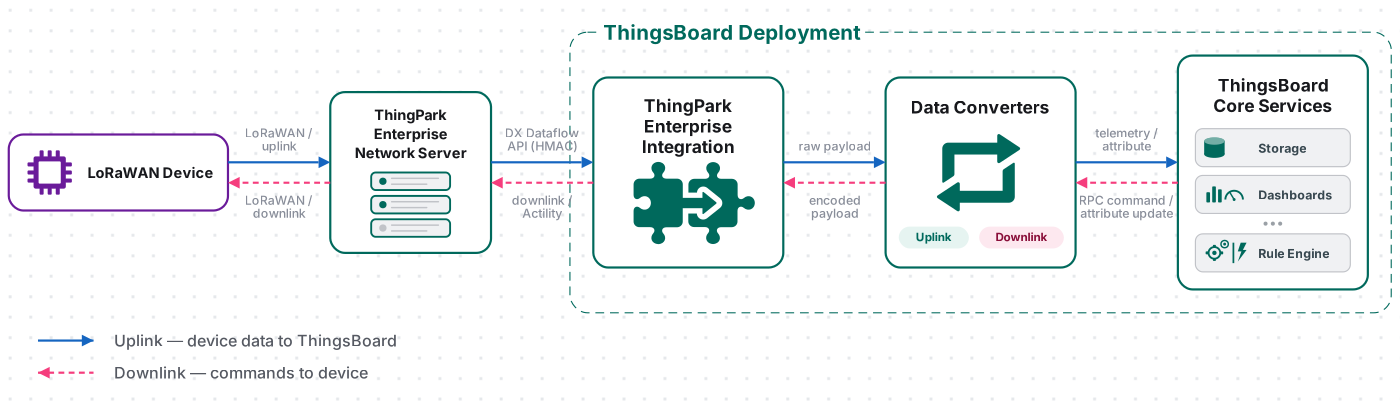
A LoRaWAN device sends an uplink to ThingPark Enterprise, which pushes it as an HMAC-signed HTTP notification to the integration’s endpoint via the DX Dataflow API. The uplink converter decodes the notification into telemetry and attributes, and the ThingsBoard Core Service stores the data, creating the device automatically on first contact. For downlink, the Rule Engine hands a message to the integration; the downlink converter encodes it, and ThingsBoard delivers it to the device through the configured Downlink URL.
Prerequisites
Section titled “Prerequisites”Before creating the integration, ensure:
- You have access to ThingsBoard PE or ThingsBoard Cloud with integration functionality enabled for your tenant.
- You have permissions to create integrations and data converters.
- You have a running ThingPark Enterprise instance with at least one registered LoRaWAN device.
- You have an AS ID and AS Key (Application Server credentials) — see Obtaining AS ID and AS Key below.
Obtain AS ID and AS Key
Section titled “Obtain AS ID and AS Key”The AS ID and AS Key authenticate ThingsBoard as an Application Server to ThingPark Enterprise. You choose these values yourself and enter the same pair in both systems.
| Credential | Length | Format | Example |
|---|---|---|---|
| AS ID | 16 hex characters (8 bytes) | Digits 0–9 and letters A–F | A8360F9312345789 |
| AS Key | 32 hex characters (16 bytes) | Digits 0–9 and letters A–F | 0122456789ABCDEF0122456789ABCDEF |
You can obtain them in two ways:
- From an existing ThingPark Enterprise application — in the TPE admin portal, open your application and find the Security (or Local Protocol Settings) section. The AS ID and AS Key are shown there; click the eye icon to reveal them if masked.
- Generate new values — use any hex string generator to produce 16 characters for the AS ID and 32 for the AS Key. Enter them in ThingsBoard first, then configure the identical values in ThingPark Enterprise.
Set Up the Integration in ThingsBoard
Section titled “Set Up the Integration in ThingsBoard”To set up the ThingPark Enterprise integration, first create an uplink data converter to process incoming messages, then create and configure the integration.
Create the Uplink Data Converter
Section titled “Create the Uplink Data Converter”The uplink converter receives a ThingPark Enterprise message (JSON containing DevEUI_uplink) and maps it to ThingsBoard device telemetry and attributes. For the full decoder function reference, see Uplink data converter.
Sample payload:
{ "DevEUI_uplink": { "Time": "2024-01-15T10:30:00.000+00:00", "DevEUI": "0018B20000000123", "FPort": 1, "FCntUp": 42, "ADRbit": 1, "MType": 4, "FCntDn": 5, "payload_hex": "0364011a", "mic_hex": "a1b2c3d4", "Lrcid": "00000065", "LrrRSSI": -85.0, "LrrSNR": 7.25, "SpFact": 7, "SubBand": "G0", "Channel": "LC1", "Lrrid": "FF0000C8", "Late": 0, "LrrLAT": 48.8566, "LrrLON": 2.3522 }}DevEUI identifies the device. payload_hex contains the raw application payload. LrrRSSI and LrrSNR are radio quality metrics from the receiving gateway.
- Go to Integrations center ⇾ Data converters.
- Click + Add data converter ⇾ Create new converter.
- Converter type — leave Uplink (selected by default).
- Integration type — in the search field, enter
ThingParkand select ThingParkEnterprise from the list. - Name — enter a converter name, for example
ThingPark Enterprise Uplink Converter. - In Main decoding configuration:
- The default device name pattern
Device $euiuses the DevEUI from the ThingPark message as the unique device name in ThingsBoard. Change it if you prefer a different naming scheme. - The default decoder is pre-filled. Leave it unchanged for this guide, or paste the decoder function below.
- The default device name pattern
- Review Advanced decoding parameters — pre-populated for ThingPark, auto-extracting telemetry keys
channel,data,fCnt,rssi, andsnr, plus attribute keysbandwidth,eui,fPort, andspreadingFactor. Adjust if needed. - Click Add.
The decoder function used in this guide:
/*** Decodes the incoming payload and returns a structured object containing telemetry data and attributes.** @param {byte[]} input - The raw payload received as an array of bytes.* @returns {Object} output - The structured output with decoded telemetry and attributes.*/
function decodePayload(input) {  // Initialize the output object with empty attributes and telemetry for clarity.  var result = { attributes: {}, telemetry: {}};
  // Decode serial number (SN) from the first 4 bytes of the payload.  // Press '?' icon in the top right corner to learn more about built in helper functions and capabilities.  result.attributes.sn = parseBytesToInt(input, 0, 4);
  // Extract the timestamp from metadata (represented in milliseconds).  var timestamp = metadata.ts; // ts is the timestamp parsed from the incoming message's time, or returns the current time if it cannot be parsed.
  // Initialize an object to store decoded key/value telemetry data.  var values = {};
  // Decode battery level from the 5th byte of the payload.  values.battery = parseBytesToInt(input, 4, 1);
  // Decode temperature from the 6th and 7th bytes of the payload (divided by 100).  values.temperature = parseBytesToInt(input, 5, 2) / 100.0;
  // Decode saturation from the 8th byte of the payload.  values.saturation = parseBytesToInt(input, 7, 1);
  // Combine the timestamp with values and add it to the telemetry.  result.telemetry = {    ts: timestamp,    values: values  };
  // Return the fully constructed output object.  return result;  // Same logic, less code:  // return {  //     attributes: {  //         sn: parseBytesToInt(input, 0, 4)  //     },  //     telemetry: {  //         ts: convertDateToTimestamp(metadata.time),  //         values: {  //             battery: parseBytesToInt(input, 4, 1),  //             temperature: parseBytesToInt(input, 5, 2) / 100.0,  //             saturation: parseBytesToInt(input, 7, 1)  //         }  //     }  // };}
var result = decodePayload(payload);// Uncomment this code block to overwrite values set in the main configuration window. Useful if you extract device/asset/customer/group names from the payload;// result.type = 'DEVICE'; // Entity type allows you to choose type of created entity. Can be 'DEVICE' or 'ASSET'.// result.name = 'Temperature Sensor'; // Device or asset name (the value must be unique)// result.profile = 'IndustrialSensorProfile'; // Device or asset profile name.// result.customer = 'MyCustomer'; // If customer is not null - created entity will be assigned to customer with such name.// result.group = 'SensorsGroup'; // If group is not null - created entity will be added to the entity group with such name.
// Return the final result object.return result;/*** Decodes the incoming payload and returns a structured object containing telemetry data and attributes.** @param {number[]} input - The raw payload received as an array of bytes.* @returns {Object} output - The structured output with decoded telemetry and attributes.*/
function decodePayload(input) { // Initialize the output object with empty attributes and telemetry for clarity. var result = { attributes: {}, telemetry: {}};
// Decode serial number (SN) from the first 4 bytes of the payload. // Press '?' icon in the top right corner to learn more about built in helper functions and capabilities. result.attributes.sn = parseBytesToInt(input, 0, 4);
// Extract the timestamp from metadata (represented in milliseconds). var timestamp = metadata.ts; // ts is the timestamp parsed from the incoming message's time, or returns the current time if it cannot be parsed.
// Initialize an object to store decoded key/value telemetry data. var values = {};
// Decode battery level from the 5th byte of the payload. values.battery = parseBytesToInt(input, 4, 1);
// Decode temperature from the 6th and 7th bytes of the payload (divided by 100). values.temperature = parseBytesToInt(input, 5, 2) / 100.0;
// Decode saturation from the 8th byte of the payload. values.saturation = parseBytesToInt(input, 7, 1);
// Combine the timestamp with values and add it to the telemetry. result.telemetry = { ts: timestamp, values: values };
// Return the fully constructed output object. return result; // Same logic, less code: // return { // attributes: { // sn: parseBytesToInt(input, 0, 4) // }, // telemetry: { // ts: convertDateToTimestamp(metadata.time), // values: { // battery: parseBytesToInt(input, 4, 1), // temperature: parseBytesToInt(input, 5, 2) / 100.0, // saturation: parseBytesToInt(input, 7, 1) // } // } // };}
var result = decodePayload(payload);// Uncomment this code block to overwrite values set in the main configuration window. Useful if you extract device/asset/customer/group names from the payload;// result.type = 'DEVICE'; // Entity type allows you to choose type of created entity. Can be 'DEVICE' or 'ASSET'.// result.name = 'Temperature Sensor'; // Device or asset name (the value must be unique)// result.profile = 'IndustrialSensorProfile'; // Device or asset profile name.// result.customer = 'MyCustomer'; // If customer is not null - created entity will be assigned to customer with such name.// result.group = 'SensorsGroup'; // If group is not null - created entity will be added to the entity group with such name.
// Return the final result object.return result;
/*** Parse a slice of bytes from an array into an integer (big-endian).** @param {number[]} input - The array of bytes.* @param {number} offset - The starting index.* @param {number} length - The number of bytes to convert.* @returns {number} - The resulting integer.*/function parseBytesToInt(input, offset, length) { var result = 0; for (var i = offset; i < offset + length; i++) { result = (result << 8) | (input[i] & 0xFF); } return result;}Converter Input
| Variable | Type | Description |
|---|---|---|
payload | byte array | The raw bytes of the HTTP POST body sent by ThingPark Enterprise. Call decodeToJson(payload) to parse it into the DevEUI_uplink structure shown above. |
metadata | object | Key-value map populated from the integration, including integrationName. |
Adapt the Decoder to Your Device
- Match your payload structure — update the byte offsets, lengths, and field names in
decodePayloadto match your device’s binary specification. - Add or remove fields — add more
parseBytesToIntcalls (orparseBytesToFloat, string extraction, etc.) for additional sensors; remove entries your device does not transmit. - Timestamp —
metadata.tsis already parsed from the message’sTimefield (in milliseconds); use it directly instead of converting a date string yourself. - Attributes — move static device properties (model, firmware version, installation site) to
attributesand keep frequently changing values intelemetry. - Override device identity from the payload — set
result.name,result.profile,result.group, orresult.customerto derive device identity from payload content rather than the Main decoding configuration template.
Create the ThingPark Enterprise Integration
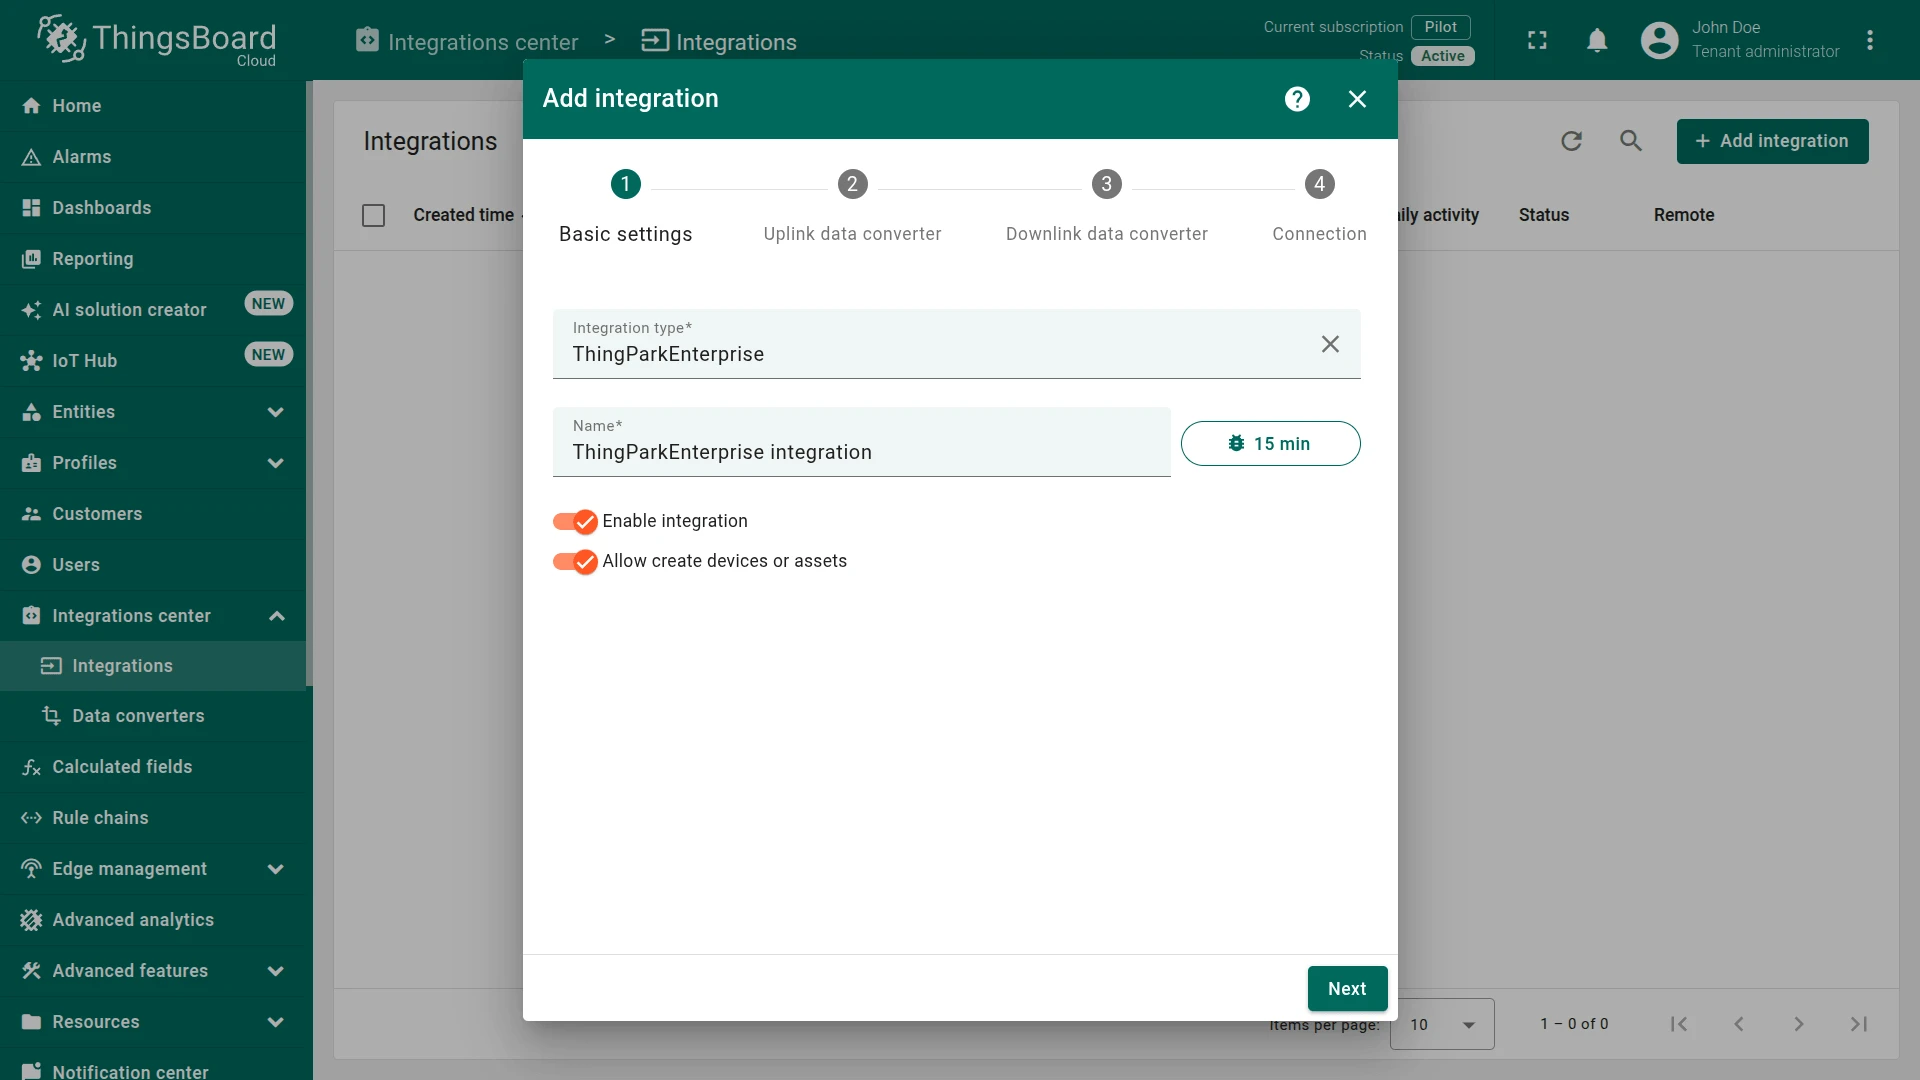
Section titled “Create the ThingPark Enterprise Integration”- Go to Integrations center ⇾ Integrations and click + Add integration.
- Basic settings:
- Set Integration type to ThingParkEnterprise.
- Enter a Name, or keep the default
ThingParkEnterprise integration. - Leave Enable integration and Allow create devices or assets enabled so that devices are created automatically when data is received for the first time.
- Click Next.
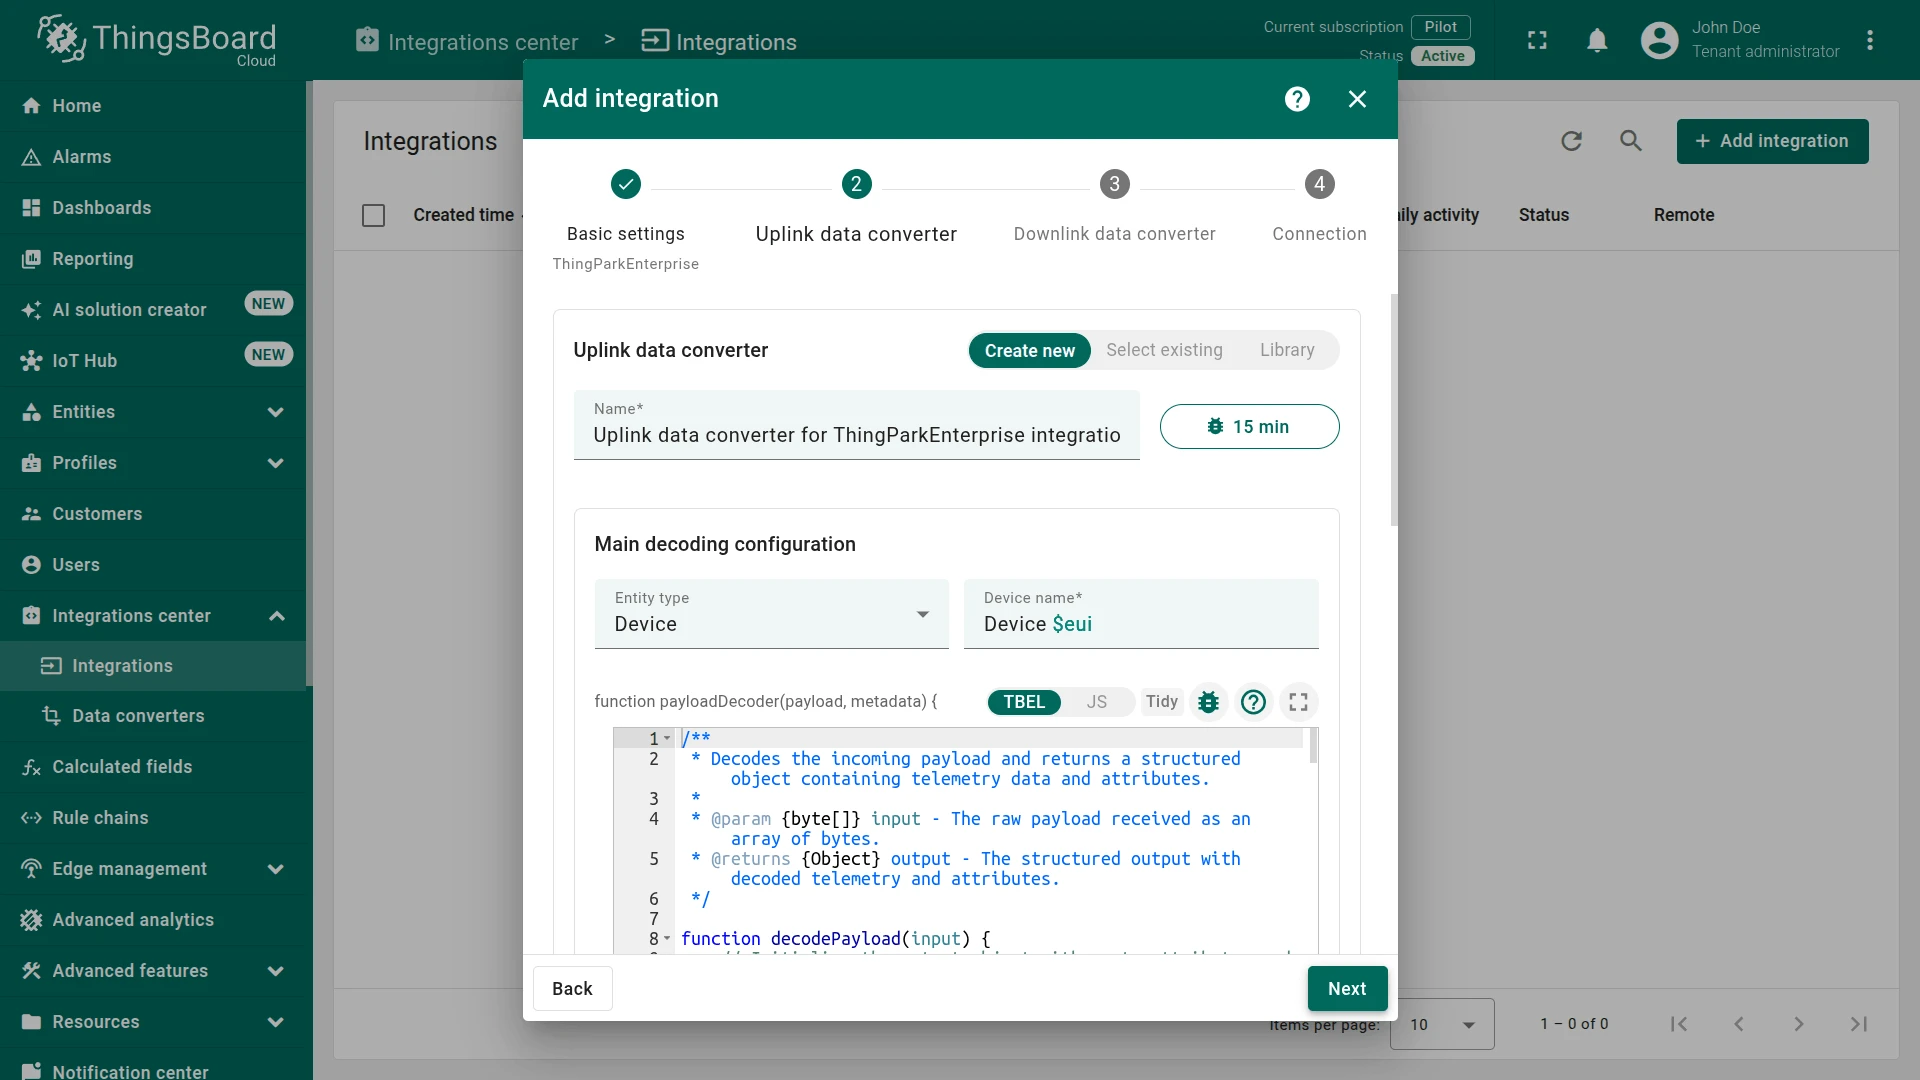
- Uplink data converter:
- Click Select existing and choose the ThingPark Enterprise Uplink Converter created above, or click Create new to define the decoder inline.
- Click Next.
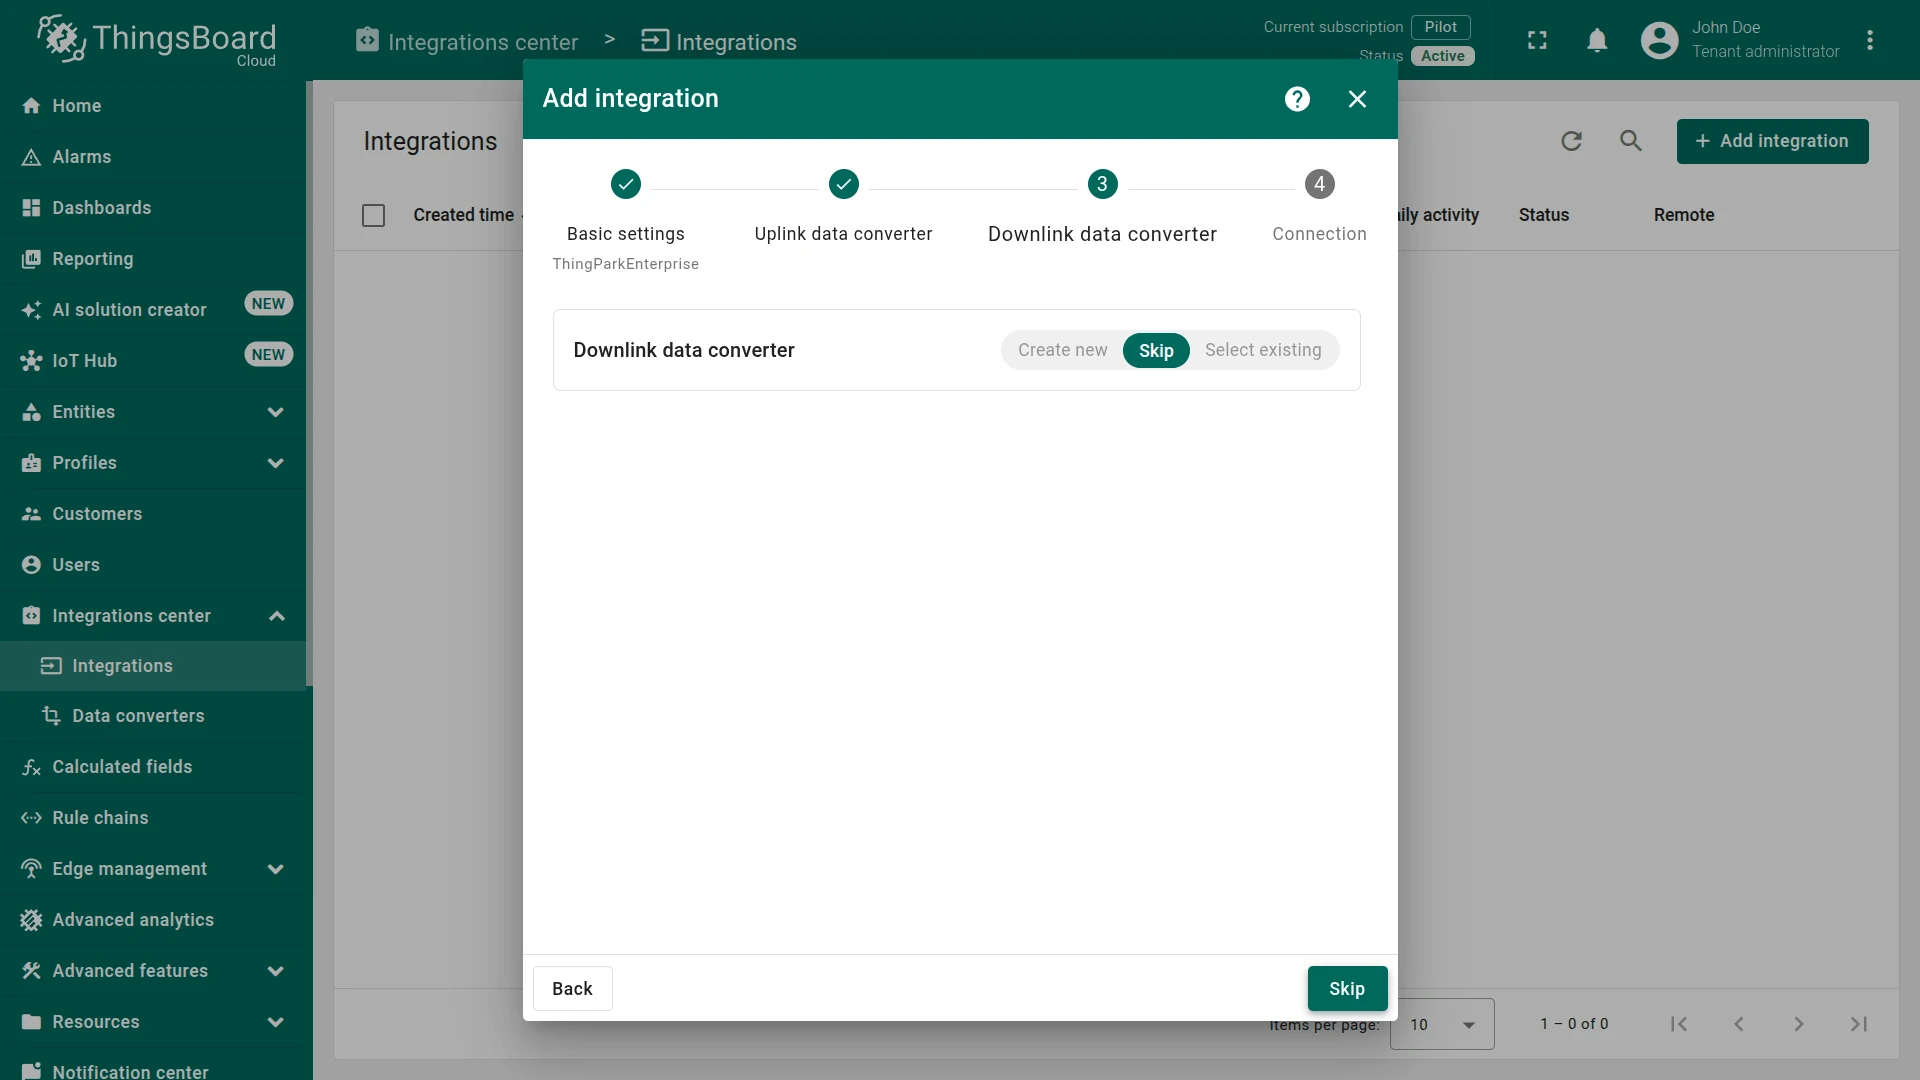
- Downlink data converter:
- Click Skip — a downlink converter is only needed when ThingsBoard must send commands back to devices. See Configure and Test Downlink to add one later.
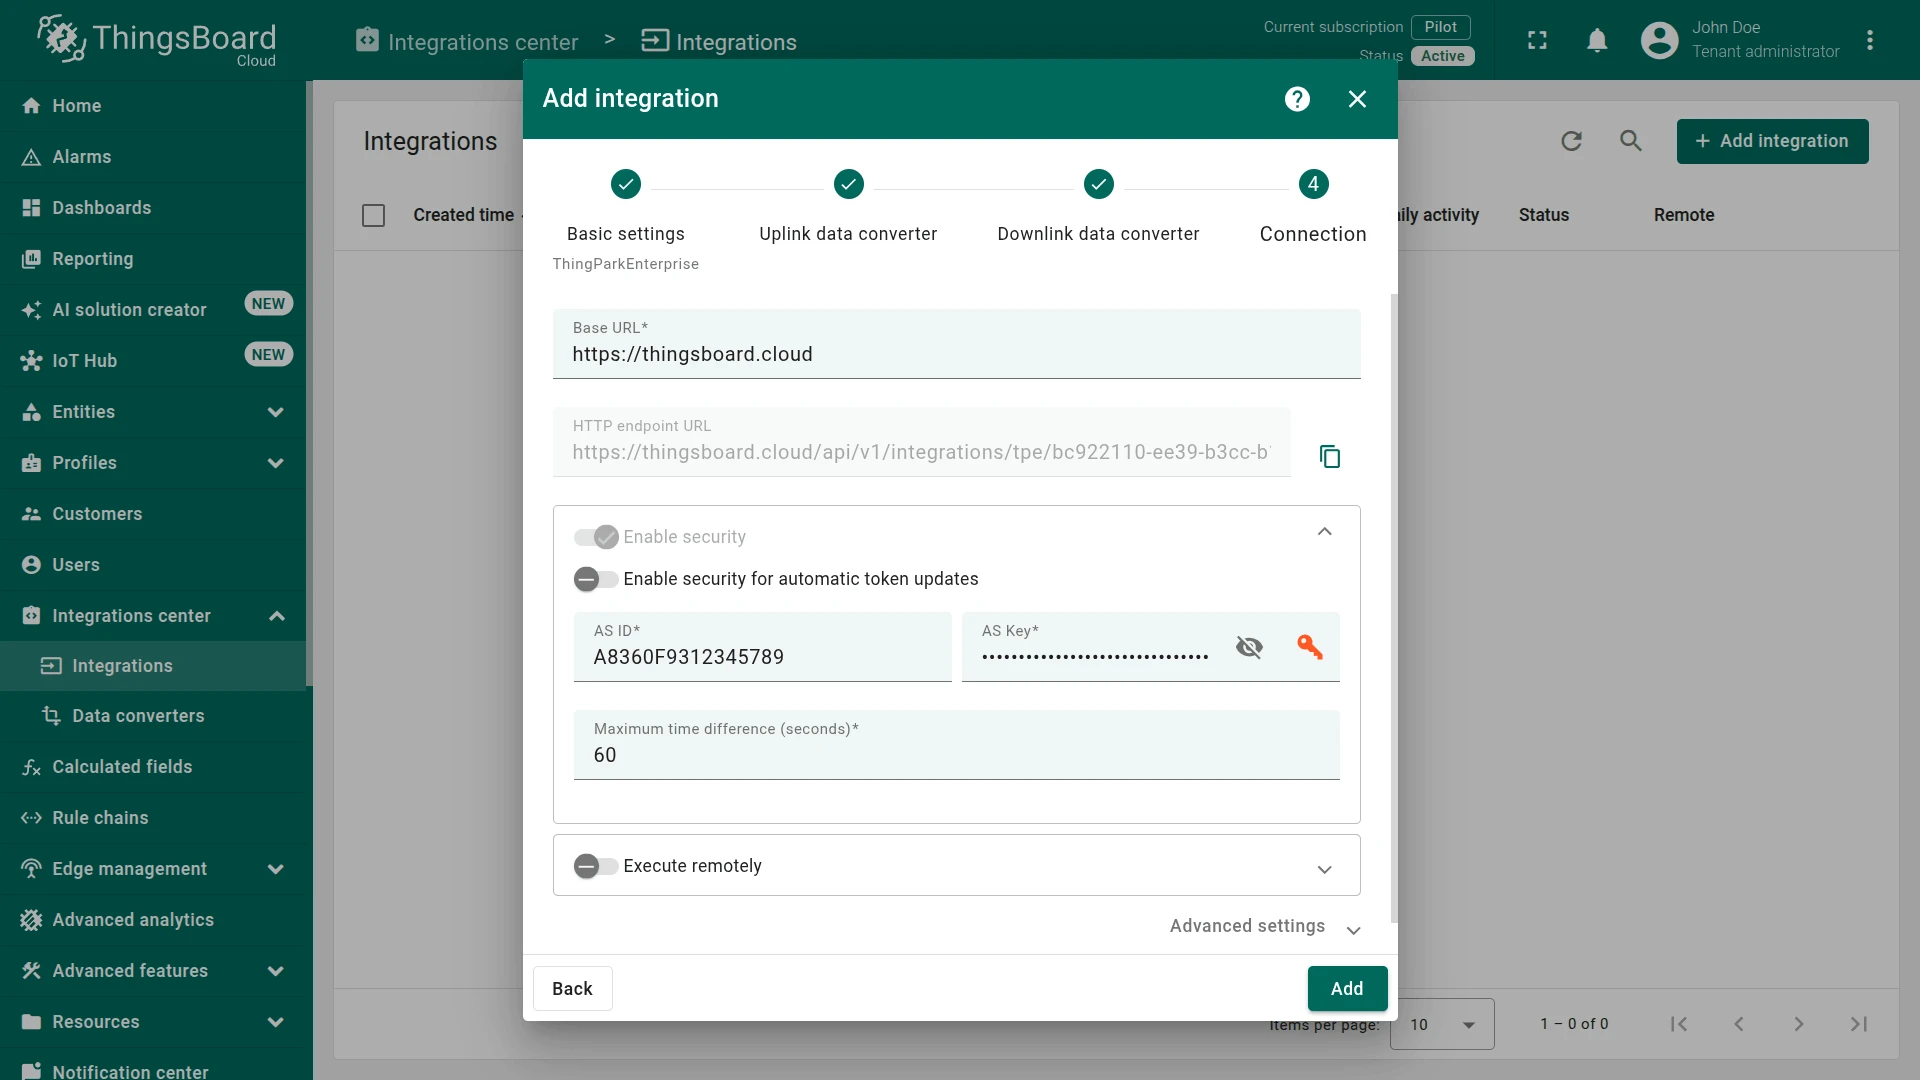
- Connection:
- Base URL — pre-filled with your ThingsBoard instance URL (for example,
https://thingsboard.cloud). - Copy the generated HTTP endpoint URL in the following format:
https://{base-url}/api/v1/integrations/tpe/{integration-id}. You will configure ThingPark Enterprise to send uplink data to this address using HTTP POST requests. Enable security — enable this option to validate the HMAC-SHA256 signature of incoming messages. When enabled, configure:
- AS ID — a 16-character hexadecimal string. It must match the value configured in ThingPark Enterprise.
- AS Key — a 32-character hexadecimal string. It must match the value configured in ThingPark Enterprise.
- Maximum time difference (seconds) — the allowed clock difference when validating message timestamps. The default value is
60.
- Enable security for automatic token updates — allows ThingPark Enterprise to refresh the authentication token automatically.
- Optionally, expand Advanced settings to configure the downlink URL and metadata.
- Base URL — pre-filled with your ThingsBoard instance URL (for example,
- Click Add to save the integration.
Connection Settings
Section titled “Connection Settings”Base URL
Your ThingsBoard instance base URL (e.g. https://thingsboard.cloud). Pre-filled automatically; used to construct the HTTP endpoint URL.
HTTP Endpoint URL
The unique endpoint generated by ThingsBoard for this integration, in the form:
https://{base-url}/api/v1/integrations/tpe/{integration-id}Configure your ThingPark Enterprise application to POST device uplinks to this URL. The URL is stable as long as the integration exists.
Enable Security
When enabled, ThingsBoard validates the HMAC-SHA256 signature that ThingPark Enterprise attaches to each notification. Requires:
| Field | Description |
|---|---|
| AS ID | 16-character hex string (8 bytes) identifying this Application Server. Must match exactly what you configure in ThingPark Enterprise. |
| AS Key | 32-character hex string (16 bytes) used to compute and verify the HMAC signature. Must match exactly what you configure in ThingPark Enterprise. |
| Maximum time difference (seconds) | Allowed clock skew in seconds when checking the Time field in the notification (default: 60). |
Enable Security for Automatic Token Updates
When enabled, ThingPark Enterprise can refresh the AS authentication token automatically without manual intervention.
Replace Response Status from ‘No-Content’ to ‘OK’
Some ThingPark Enterprise versions expect an HTTP 200 OK response instead of 204 No Content. Enable this toggle if your ThingPark Enterprise server logs HTTP errors after a successful uplink delivery.
Downlink URL
The ThingPark Enterprise endpoint for sending downlink commands to devices (e.g. https://api.thingpark.com/thingpark/lrc/rest/downlink). Required only if you configure a downlink converter and rule chain. Adjust the base host to match your ThingPark Enterprise installation.
Execute Remotely
When enabled, ThingsBoard generates an Integration key and Integration secret for running the integration outside the ThingsBoard cluster — useful when ThingsBoard is not publicly reachable. See Remote Integration.
Configure ThingPark Enterprise
Section titled “Configure ThingPark Enterprise”After saving the ThingsBoard integration, configure ThingPark Enterprise to push device uplinks to it.
Create an HTTP Application
Section titled “Create an HTTP Application”- Log in to your ThingPark Enterprise administration portal.
- Go to Applications in the left panel and click Create.
- Select the application type HTTP.
- Configure the Destination:
- URL — paste the HTTP endpoint URL copied from the ThingsBoard integration connection step.
- Content-type — select
application/json. - AS ID — enter the same AS ID you set in ThingsBoard (16-character hex string).
- AS Key — enter the same AS Key you set in ThingsBoard (32-character hex string).
- Click Save to create the application.
Assign Devices to the Application
Section titled “Assign Devices to the Application”- In ThingPark Enterprise, go to Devices.
- Open the device you want to connect to ThingsBoard.
- In the Associated Application field (sometimes labelled Connectivity Plan), select the HTTP application you just created.
- Click Save.
Once assigned, ThingsBoard identifies the device by its DevEUI and creates a device named TPE-<DevEUI> on the first uplink, provided Allow create devices or assets is enabled on the integration.
Test Uplink
Section titled “Test Uplink”Testing requires an uplink from a real device registered in ThingPark Enterprise. Unlike a plain HTTP webhook, a simulated request cannot easily stand in for one here: when Enable security is on, ThingsBoard rejects any request whose HMAC-SHA256 signature doesn’t match your AS ID/AS Key pair, so a hand-crafted test request would need a correctly computed signature.
Verify in ThingPark Enterprise
Section titled “Verify in ThingPark Enterprise”After your device sends an uplink, open the Wireless Logger in ThingPark Enterprise. Look for a log entry with status “Sent to Application” (indicated by a green upward arrow). This confirms that ThingPark Enterprise successfully delivered the uplink to ThingsBoard.
Verify Integration Events
Section titled “Verify Integration Events”Go to Integrations center ⇾ Integrations, open ThingParkEnterprise integration, and click the Events tab. An Uplink event with Status: OK confirms the message was processed. Click … in the Message column to inspect the raw payload.
Verify Converter Events
Section titled “Verify Converter Events”Go to Integrations center ⇾ Data converters, open the uplink converter, and click the Events tab. Inspect the In (raw payload), Out (decoded result), and Metadata columns to verify the decoder output.
Verify Device Provisioning
Section titled “Verify Device Provisioning”Go to Entities ⇾ Devices. A device named TPE-<DevEUI> is automatically provisioned on the first message. Open it and check:
- Latest telemetry —
fPort,fCntUp,rssi,snr, andspreadingFactorreflect values from the uplink. - Attributes —
devEui,subBand,channel, andintegrationNameare set from the notification.
Expected result: the device appears in Entities ⇾ Devices shortly after the uplink is delivered, with telemetry and attributes matching the values decoded by the converter.
Configure Downlink
Section titled “Configure Downlink”The downlink converter (encoder) transforms a Rule Engine message into the payload ThingsBoard sends back to the device. ThingsBoard posts the encoded payload to the Downlink URL — pre-filled under Advanced settings in the integration’s Connection step to https://api.thingpark.com/thingpark/lrc/rest/downlink; adjust it only if your ThingPark installation uses a different host. For the full encoder function reference, see Downlink data converter.
The encoder output must include two fields in metadata required for delivery:
| Field | Description |
|---|---|
metadata.DevEUI | The device EUI — read from metadata.cs_eui, injected by the Originator attributes node from the device client attribute eui (ThingsBoard prefixes client-scope attributes with cs_). |
metadata.fPort | The LoRaWAN port — read from metadata.cs_fPort, injected by the Originator attributes node from the device client attribute fPort. |
Create and Assign the Downlink Converter
Section titled “Create and Assign the Downlink Converter”- Go to Integrations center ⇾ Integrations and open the ThingParkEnterprise integration.
- Click the pencil icon to enter edit mode.
- In the Downlink data converter field, click Create new.
- In the Add data converter dialog:
- Enter a name for the converter, for example,
ThingParkEnterprise Downlink Converter. - Use the default encoder script or replace it with your own implementation.
- Click Add.
- Enter a name for the converter, for example,
- Click Apply changes to save the integration.
The encoder function used in this tutorial:
// Encode downlink data from incoming Rule Engine message.// msg - JSON message payload (e.g. { "state": "on" })// msgType - message type, e.g. 'ATTRIBUTES_UPDATED'// metadata - enriched by the Originator attributes node with device client attributes.//            ThingsBoard prefixes client-scope attributes with "cs_"://            metadata.cs_eui — Device EUI stored on first uplink (e.g. "20635F00C5000660")//            metadata.cs_fPort — LoRaWAN frame port stored on first uplink (e.g. "1")
var eui = metadata.cs_eui;if (eui == null) {  raiseError("DevEUI is missing (expected metadata.cs_eui).");}
// Read port from the device client attribute "fPort" (set per-device).// Falls back to 1 if the attribute is not set.var port = (metadata.cs_fPort != null && metadata.cs_fPort != '') ? parseInt(metadata.cs_fPort) : 1;
var result = {  // Downlink data content type: JSON, TEXT, or BINARY (base64 format).  contentType: "JSON",
  // Downlink data — serialise the full message payload as a JSON string.  data: JSON.stringify(msg),
  // metadata must include DevEUI and fPort for ThingPark delivery.  metadata: {    "DevEUI": eui,    "fPort": port  }};
return result;// Encode downlink data from incoming Rule Engine message.// msg - JSON message payload (e.g. { "state": "on" })// msgType - message type, e.g. 'ATTRIBUTES_UPDATED'// metadata - enriched by the Originator attributes node with device client attributes.// ThingsBoard prefixes client-scope attributes with "cs_":// metadata.cs_eui — Device EUI stored on first uplink (e.g. "20635F00C5000660")// metadata.cs_fPort — LoRaWAN frame port stored on first uplink (e.g. "1")
var eui = metadata.cs_eui;
// Read port from the device client attribute "fPort" (set per-device).// Falls back to 1 if the attribute is not set.var port = parseInt(metadata.cs_fPort) || 1;
var result = { // Downlink data content type: JSON, TEXT, or BINARY (base64 format). contentType: "JSON",
// Downlink data — serialise the full message payload as a JSON string. data: JSON.stringify(msg),
// metadata must include DevEUI and fPort for ThingPark delivery. metadata: { "DevEUI": eui, "fPort": port }};
return result;Configure the Root Rule Chain
Section titled “Configure the Root Rule Chain”To trigger a downlink when an attribute changes (for example, a shared attribute update), add two nodes to the Root Rule Chain: an Originator attributes node (Enrichment category) that reads the device eui and fPort client attributes into message metadata, and an Integration Downlink node (Action category) that forwards the encoded message to the ThingPark integration.
- Open Rule Chains ⇾ Root Rule Chain.
- In the node panel, search for originator attributes. The node appears under the Enrichment category. Drag it onto the canvas.
- Configure the node:
- Name —
Fetch eui and fPort. - Under Client attributes, add the following keys:
euiandfPort. - Set Add originator attributes to to Metadata.
- Click Add.
- Name —
- In the node panel, search for integration downlink. The node appears under the Action category. Drag it onto the canvas.
- Configure the node:
- Name —
Downlink to ThingPark Enterprise. - Integration — select your ThingPark Enterprise integration.
- Click Add.
- Name —
- Connect the Message Type Switch node to the Fetch eui and fPort node using the Post attributes and Attributes Updated relations.
- Connect the Fetch eui and fPort node to the Downlink to ThingPark Enterprise node using the Success relation.
- Click Apply changes.
Trigger a Downlink
Section titled “Trigger a Downlink”Adding or updating a shared attribute triggers the Rule Chain, which runs the downlink converter and posts the encoded command to ThingPark.
- Go to Entities ⇾ Devices, select your device (e.g.
Device 20635F00C5000660), and open the Attributes tab. - Switch to Shared attributes and click +.
- Enter a key (e.g.
powerState) and a value (e.g.on), then click Add.
Verify Downlink Delivery
Section titled “Verify Downlink Delivery”Check Downlink Converter Events
Go to Integrations center ⇾ Data converters, open ThingPark Enterprise Downlink Converter, and click the Events tab — a Downlink event should appear in the list:
- In — the
ATTRIBUTES_UPDATEDmessage containingpowerState. - Out — the encoded JSON payload, with
DevEUIandfPortset inmetadata.
Check Delivery on ThingPark Enterprise
Open the ThingPark Enterprise Wireless Logger and confirm a downlink entry for the device — this indicates ThingsBoard successfully posted the payload to the Downlink URL for delivery to the device over LoRaWAN.
Troubleshooting
Section titled “Troubleshooting”| Symptom | Likely Cause | Fix |
|---|---|---|
| HTTP 401 or 403 from ThingPark Enterprise | AS ID or AS Key mismatch | Verify that AS ID (16 hex chars) and AS Key (32 hex chars) are identical in both ThingsBoard and the ThingPark Enterprise application. |
| HTTP 401 or 403 even with correct AS ID/AS Key | Clock skew between ThingsBoard and ThingPark Enterprise exceeds Maximum time difference | Confirm both servers’ clocks are synchronized (e.g. via NTP), or increase Maximum time difference (seconds) in Enable security. |
DevEUI_downlink_Rejected or DevEUI_notification messages never reach the uplink converter | Only DevEUI_uplink and DevEUI_downlink_Sent are accepted while security is enabled (mandatory for this integration type) | See the note under Enable Security above. |
| No uplinks received in ThingsBoard | Incorrect endpoint URL | Check the URL in the ThingPark Enterprise application — it must match the HTTP endpoint URL from ThingsBoard exactly, with no trailing spaces or protocol mismatch. |
| No uplinks received in ThingsBoard | Device not assigned to the HTTP application | Confirm the device’s Associated Application in ThingPark Enterprise is set to the HTTP application pointing to ThingsBoard. |
| Uplink received but telemetry is empty | Payload field mapping in decoder | Check the Converter events tab. Inspect the In column to see the raw payload, then verify your decoder correctly references json.DevEUI_uplink fields. |
| Device not appearing in ThingsBoard | Allow create devices or assets is disabled | Open the integration, click the edit icon, and enable Allow create devices or assets in Basic settings. |
| Downlink not delivered | Downlink URL not set in Advanced settings | Open the integration, expand Advanced settings, and confirm Downlink URL points to your ThingPark Enterprise installation. |
| Downlink not delivered | No rule chain routes messages to the integration | Confirm a rule chain node forwards the relevant message type (e.g. Attributes Updated) to an Integration downlink node pointing to the ThingParkEnterprise integration. |
See Also
Section titled “See Also”- Integrations Overview — how ThingsBoard connects to external platforms and how uplink/downlink flow works
- ThingPark Integration — connect to the hosted ThingPark network server instead of a private, on-premise ThingPark Enterprise deployment
- Uplink Data Converter — full decoder function reference: input parameters, output fields, and scripting patterns
- Downlink Data Converter — full encoder function reference: input parameters, output fields, and scripting patterns
- Remote Integration — run the integration outside the ThingsBoard server to reach ThingPark Enterprise from a private network
- TBEL scripting reference — built-in functions and operators for writing converter scripts
- Rule Engine — how the Root Rule Chain routes shared attribute updates to the downlink converter
Was this helpful?